Kitchen Systems
How to Organize Spices in Your Kitchen: The Complete System
A room-by-room, jar-by-jar plan for turning a chaotic spice cabinet into a system you’ll actually keep up with — no matter how small your kitchen is.
Getting Started
Why Spice Organization Matters
Open ten kitchen cabinets at random and you will probably find the same scene behind at least seven of those doors: a shallow drawer or narrow shelf crammed with mismatched bottles, faded labels facing every direction except out, and at least one jar of something that has not been restocked since a move two apartments ago. Spice organization is one of those chores that never feels urgent until the exact moment you need it — halfway through browning onions, with a recipe calling for smoked paprika, and no idea whether you own any, let alone where it might be.
The case for fixing this goes beyond tidiness. A disorganized spice cabinet costs you in three concrete ways. First, it costs time — the average home cook spends far longer hunting for seasonings than actually measuring them out, and that friction adds up over hundreds of meals a year. Second, it costs money, because duplicate jars are almost inevitable when you can’t see what you already own; it is astonishingly common to find two or three half-used containers of cumin or garlic powder scattered across different shelves. Third, and most overlooked, it costs flavor. Ground spices lose potency steadily once opened, and when jars are buried in the back of a cabinet, they tend to get used rarely and replaced rarely, which means a lot of home cooking is seasoned with spices that are years past their aromatic peak.
There is also a simpler, more personal reason to get this right: a well-organized spice collection changes how you cook. When every seasoning is visible, labeled, and within arm’s reach, you reach for more of them. You start improvising instead of defaulting to salt and pepper. You notice when the cinnamon is running low before a baking project stalls out. Organization, in other words, is not just storage — it’s an invitation to cook more confidently.
This guide walks through a complete, repeatable system for organizing spices in any kitchen, whether you’re working with a deep pull-out drawer, a single narrow cabinet, open shelving, or a countertop rack. Each step below builds on the one before it, starting with the part almost everyone skips: actually looking at what you have.
Audit & Purge Your Spice Collection
Before you buy a single organizer, empty every spice you own onto a countertop or table. This is the step people skip most often, and it’s the one that makes every later step easier. You cannot design a storage system for a collection you haven’t actually seen laid out in front of you — and you cannot know how much space you need until you know how much you’re keeping.
As you pull each jar out, sort it into three piles: keep, replace, and toss. A spice belongs in the toss pile if it has no smell left when you crack the lid and rub a pinch between your fingers, if it’s been open for more than two to three years (ground spices) or three to four years (whole spices), or if it’s a duplicate of something you already have plenty of. Whole spices — peppercorns, cinnamon sticks, whole cumin seed — hold their potency far longer than ground versions, so don’t toss those on the same timeline as powders.
The replace pile is for spices you use regularly but that are clearly past their prime, plus staples you keep running out of. Everything else goes in the keep pile, and this is the number you’ll actually be organizing around.
A quick freshness test: rub a small amount of the spice between your fingers and smell it. If the aroma is faint, dusty, or absent, the spice will add little to your cooking even if it isn’t technically “expired.” Ground spices are the biggest offenders here — pre-ground cinnamon, cumin, and chili powder lose noticeable potency within a year of opening.
| Spice Type | Typical Shelf Life (Opened) | Freshness Signal |
|---|---|---|
| Ground spices (paprika, cumin, cinnamon) | 1-2 years | Faint smell, dull color |
| Whole spices (peppercorns, cloves, cardamom pods) | 3-4 years | No aroma when crushed |
| Dried herbs (oregano, basil, thyme) | 1-3 years | Crumbles to dust, no scent |
| Spice blends (taco seasoning, curry powder) | 1-2 years | Flat, one-note smell |
| Salt & pure sugar-based blends | Indefinite | Clumping only, not spoilage |
Once you’ve sorted, count your keep pile. That number, not the number of jars currently crammed into your cabinet, is what determines how much storage space you actually need in Step 2.
Choose Your Storage System
With a clear count of what you’re keeping, the next decision is where it’s all going to live. This is the step where kitchen layout matters most, because the “best” storage system is really just the one that fits your cabinets, your counter space, and how you cook. There is no universally correct answer here — a two-tier drawer insert that’s perfect for a deep pull-out drawer will be useless if your kitchen has no drawers near the stove at all.
Broadly, spice storage falls into four categories: drawer inserts, cabinet door racks, wall-mounted rails or shelves, and countertop turntables or stands. Each one solves a different spatial problem, and many well-organized kitchens actually use two of these in combination — for example, a drawer insert for everyday cooking spices plus a small shelf for baking spices near the mixer.
If you’re still deciding on hardware, it’s worth browsing dedicated organizer systems before committing, since the right insert can make the difference between a system that lasts and one that slides back into chaos within a month. We’ve put together a full breakdown of the best spice organizers for different cabinet and drawer configurations if you want to compare options side by side.
Drawer inserts work best when…
- You have a deep drawer near the stove
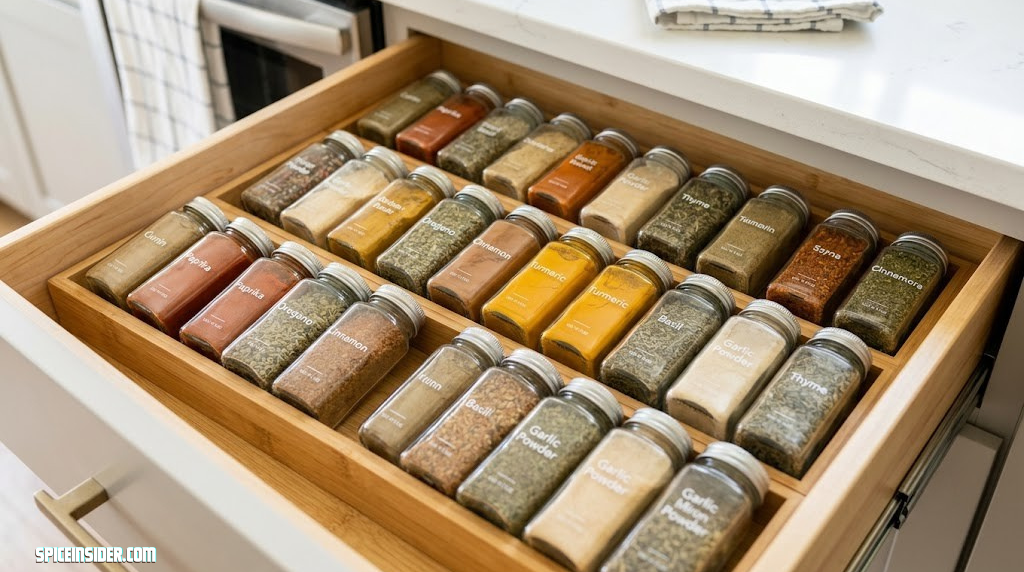
- You want jars visible from above
- You prefer a completely closed look
Wall rails work best when…
- Cabinet space is limited
- You want spices visible while cooking
- Your kitchen has open wall space nearby
Whichever format you land on, prioritize one thing above all: proximity to where you actually cook. A beautiful shelf across the kitchen from your stove will get used less than an ugly drawer that’s an arm’s length away. Convenience wins over aesthetics every time when it comes to whether a system actually sticks.

Popular pick: Expandable spice drawer organizer with adjustable tiers — fits most standard kitchen drawers and holds 20+ jars visible from above.
Check Price on AmazonDecant Into Uniform Containers
This is the step that transforms a spice cabinet from “collection of stuff” into “system.” Decanting means transferring spices out of their original packaging — mismatched bottles, bags, tins of every shape and size — into a matching set of jars. It is optional in the sense that you can organize a cabinet without doing it, but it is the single highest-impact change you can make, because uniform containers are what make a drawer or shelf look and function like a system rather than a junk drawer.
Uniformity solves several problems at once. Matching jars stack and nest predictably, so you can calculate exactly how many will fit in a given space. Clear glass or acrylic containers let you see fill level at a glance, which naturally prompts restocking before you run out mid-recipe. And because store-bought spice packaging varies wildly — tall skinny bottles, short wide tins, awkward pouches — decanting removes the single biggest obstacle to fitting spices into a drawer insert or shelf efficiently.
When choosing jars, glass is generally preferable to plastic for long-term flavor retention, since plastic can absorb odors over time and occasionally imparts a faint smell of its own to delicate spices. Square or rectangular jars use drawer and shelf space more efficiently than round ones, since they eliminate the wasted gaps that circular containers leave between each other. If you’re decanting a large collection at once, a wide-mouth jar with a removable lid makes the process faster than working through narrow bottle necks one spoonful at a time.
Work in batches by category rather than trying to decant your whole collection in one sitting — start with the spices you use daily, then move to baking spices, then to the rarely-used specialty jars. This keeps the project from stalling out halfway through, which is the most common reason spice organization projects don’t get finished.
Label Every Jar Clearly
Once your spices are decanted into matching jars, labeling is what keeps the system usable. This sounds obvious, but it’s the step most people rush through, slapping a handwritten sticker on the side of a jar and calling it done. The problem is that “side of jar” labels are invisible the moment jars are arranged in a drawer viewed from above, or stacked on a shelf where only the front row is visible.
Label placement should match your storage format. For drawer inserts viewed from above, the label needs to go on the lid, since that’s the only surface you’ll actually see when opening the drawer. For shelf or door-rack storage viewed from the front, the label belongs on the body of the jar, ideally at eye level for the shelf it’s sitting on. Getting this backwards is the single most common labeling mistake, and it quietly undoes a lot of the benefit of decanting in the first place.
Beyond placement, think about what the label actually says. At minimum it needs the spice name in large, legible text. Beyond that, useful additions include the form (ground vs. whole), the date it was decanted or opened, and for blends, a short list of what’s in it. Typed labels from a label maker or printed label sheets read more consistently than handwriting, especially once a kitchen has some steam and grease exposure over time, though a paint pen on chalkboard-style labels works well too if you want a more custom look.
For a full walkthrough of label materials, layout templates, and how to make labels that survive months of kitchen use without peeling or smudging, see our dedicated guide on how to label spice jars.
| Label Style | Best For | Durability |
|---|---|---|
| Printed label sheets | Large collections, consistent look | High with laminate coating |
| Label maker tape | Quick, minimal, editable | Medium-high |
| Chalkboard-style + paint pen | Rustic aesthetic, reusable jars | Medium, needs occasional touch-up |
| Handwritten stickers | Fast, budget option | Low, fades and peels fastest |
Pick an Organizing Order
With jars decanted and labeled, the next decision is what order to arrange them in. There isn’t a single correct answer, but there are a handful of proven systems, and the right one depends on how your brain naturally searches for things and how large your collection is.
Alphabetical order is the most common choice, and for good reason: it’s the fastest to search when you’re new to a system, since you don’t need to remember any categorization logic — you just think of the spice name and scan for the first letter. It works best for collections of 20 jars or more, where browsing by category would mean scanning through several small groups anyway.
Frequency of use groups your most-reached-for spices — salt, pepper, garlic powder, cumin, paprika — in the most accessible spot, with less-used specialty spices pushed to the back or a secondary location. This works well for smaller, tighter kitchens where prime real estate near the stove is limited and you want zero wasted motion on the spices you use every single day.
Cuisine or category grouping clusters spices by how you cook — a “baking” section with cinnamon, nutmeg, and vanilla; an “Indian cooking” section with turmeric, garam masala, and mustard seed; a “Tex-Mex” section with chili powder, cumin, and oregano. This suits cooks who plan meals around specific cuisines and want to grab an entire flavor profile’s worth of jars at once.
Many well-run kitchens actually use a hybrid: alphabetical order within a frequency-based split, so the everyday jars are alphabetized in the front row and the specialty jars are alphabetized in a secondary drawer or shelf behind them. Whatever you choose, the most important rule is consistency — pick one system and apply it everywhere, rather than mixing logic between different storage spots, which recreates the exact confusion you’re trying to eliminate.
Install Drawer or Cabinet Inserts
If Step 2 led you toward a drawer insert or cabinet door rack rather than open shelving, this is where it gets physically installed. The good news is that most modern spice organizers are designed for tool-free or minimal-tool installation, but a bit of measuring up front prevents the most common mistake: buying an insert that doesn’t actually fit the drawer depth or cabinet door clearance you have.
Before ordering anything, measure your drawer’s interior width, depth, and height with the drawer fully extended, and measure your cabinet door’s flat interior panel space if you’re considering a door-mounted rack. Subtract about half an inch from each dimension as a safety margin, since manufacturer listings are not always perfectly precise, and you want clearance so the insert doesn’t bind against drawer slides or hinges.
Two-tier or step inserts, which angle the back row of jars upward so both rows are visible from above, are the most space-efficient option for deep drawers and are usually the easiest to install since they simply sit inside the drawer without hardware. Adjustable expanding trays, which telescope to fit various drawer widths, are the most forgiving choice if you’re not confident in your measurements or if you might move the organizer to a different drawer later.
Cabinet door racks typically mount with adhesive strips or small screws into the interior door panel. Adhesive mounting is reversible and rental-friendly but has a lower weight limit, so it works best for lightweight jars rather than large bulk containers. Screw-mounted racks hold more weight securely but leave small holes if removed later, so they’re better suited to a kitchen you’re not planning to leave soon.
Once mounted or placed, do a load test before filling every slot: put in a handful of jars and open and close the drawer or door several times to confirm nothing binds, rattles loose, or scrapes against the surrounding cabinetry.

Popular pick: Adjustable two-tier step organizer that fits both cabinet shelves and deep drawers, expanding to fit widths from 10 to 20 inches.
Check Price on AmazonBuild a Dedicated Cooking Zone
The final step is less about a specific product and more about a principle: your everyday spices should live as close to your primary cooking surface as physically possible. This is the difference between a system that survives busy weeknights and one that slowly migrates back into chaos because it’s one extra step too far from where the actual cooking happens.
Walk through a typical cooking session in your head. You’re standing at the stove, a pan is heating, and you need salt, pepper, garlic powder, and whatever the recipe calls for. If reaching any of those means walking to the far side of the kitchen, opening a low cabinet, or moving other items out of the way, that friction will eventually cause you to abandon the organized system and just leave a few jars sitting out on the counter instead — which is exactly the clutter you were trying to avoid.
If your kitchen layout genuinely doesn’t allow storage right next to the stove — a common problem in galley kitchens and small apartments — the next best option is a small caddy or turntable holding just your top eight to ten most-used spices, kept on the counter or an adjacent shelf, with the rest of the collection stored further away in your main system. This two-tier approach, a small “working set” plus a larger “full collection,” is how a lot of professional kitchens handle the same spatial problem, and it scales well to home kitchens of any size.
Once this zone is set up, the organizing project is functionally complete. What’s left is upkeep, covered later in this guide, and refining the system slightly as your cooking habits change over time.
Deep Dive
Storage Method Comparison
If you’re still weighing formats after Step 2, here’s a side-by-side look at how the four main storage types stack up across the factors that actually matter day to day: visibility, capacity, cost, and how well each holds up in a working kitchen.
| Method | Visibility | Typical Capacity | Cost Range | Best Kitchen Type |
|---|---|---|---|---|
| Drawer Insert | Excellent (top-down) | 20-40 jars | $$ | Deep drawer near stove |
| Cabinet Door Rack | Good (front-facing) | 10-24 jars | $ | Cabinet adjacent to prep area |
| Wall-Mounted Rail | Excellent (always visible) | 8-20 jars | $$ | Open wall space near stove |
| Countertop Turntable | Excellent | 8-16 jars | $ | Small kitchens, limited storage |
Cost ranges vary by material and brand, but as a rough guide, expect basic plastic drawer inserts and turntables toward the lower end, and bamboo or acrylic wall rails and premium drawer systems toward the higher end. Capacity numbers assume standard 3 to 4 ounce jars; larger bulk containers will reduce the count that fits in any given format.
For a full side-by-side of specific organizer models across all four formats, including which ones hold up best to daily use, see our detailed best spice organizers roundup.
Beyond the Everyday Jars
Storing Bulk Spices & Backstock
Buying spices in bulk — from a warehouse store, an international grocer, or an online spice retailer — is one of the most effective ways to save money and guarantee freshness, since bulk sources typically turn over inventory faster than small jars sitting on a supermarket shelf for months. But bulk quantities create a second storage problem that your everyday jar system isn’t designed to solve: where does the extra pound of cumin go once you’ve filled your 4-ounce decanting jar?
The answer is a backstock system, separate from your primary spice zone. Backstock should be stored in airtight containers, ideally opaque or kept in a dark cabinet, since light is one of the fastest degraders of spice potency alongside heat and moisture. A pantry shelf, a cabinet away from the stove’s heat, or a cool basement storage area all work better for backstock than anywhere near the cooking zone itself, precisely because backstock doesn’t need to be grabbed mid-recipe — it just needs to refill your everyday jars every few weeks or months.
Good backstock practices
- Airtight containers away from heat and light
- Labeled with purchase date
- Stored separately from daily-use jars
- Vacuum-sealed bags for very large bulk buys
Common backstock mistakes
- Leaving bulk bags open after each use
- Storing near the oven or stovetop
- Mixing backstock with everyday jars
- Forgetting to date the original purchase
For a complete walkthrough of container types, portioning strategies, and how long different bulk spices realistically last in storage, our guide on how to store bulk spices covers the topic in depth.

Popular pick: Set of stackable airtight canisters designed for pantry backstock, with opaque bodies to block light exposure.
Check Price on AmazonKeeping It Working
Maintaining Your System Long-Term
The hardest part of spice organization isn’t the initial setup, it’s staying organized six months later once the novelty has worn off. Systems fail slowly, not all at once: a new spice gets bought and shoved into whatever gap is available instead of finding its alphabetical or categorical spot, a label starts to peel and doesn’t get replaced, and within a year the drawer looks close to how it did before you started.
A few habits prevent that slow drift. First, treat every new spice purchase as a two-minute task, not just a grocery item: decant it into a matching jar and label it before it goes anywhere near your storage system, rather than leaving the original packaging “just for now.” That temporary placement is where systems break down, because “just for now” tends to become permanent.
Second, do a quick seasonal check-in — even five minutes, once every few months — where you scan the collection for anything running low, anything that’s lost its aroma, and anything sitting in the wrong spot. This is far less work than the original audit because you’re maintaining rather than rebuilding, but it catches problems while they’re still small.
Third, resist the urge to over-buy specialty spices you’ll use once. A crowded system fails faster than a lean one, and a spice bought for a single recipe often ends up as dead weight taking up a labeled slot for years. If you’re unsure whether a spice will become a regular part of your cooking, consider buying the smallest available quantity first rather than committing to a large jar or bulk bag.
Finally, revisit your organizing order (Step 5) if your cooking habits shift significantly — for instance, if you start cooking a new cuisine regularly and find yourself constantly searching across categories instead of within one. A system should flex with how you actually cook, not lock you into a structure that made sense a year ago but doesn’t anymore.
What to Avoid
Common Mistakes to Avoid
A few mistakes show up again and again in spice organization projects, and knowing them in advance can save you from redoing work later.
| Mistake | Why It Backfires | Better Approach |
|---|---|---|
| Storing spices above the stove | Heat accelerates flavor loss | Store in a cabinet or drawer away from direct heat |
| Using clear jars in direct sunlight | Light degrades color and potency | Keep jars in a cabinet, or use tinted glass near windows |
| Skipping the purge step | Organizes stale spices instead of removing them | Always audit and toss before building the system |
| Labeling only the jar body for drawer storage | Label is invisible from a top-down view | Label the lid for any drawer-based system |
| Buying organizers before measuring | Risk of poor fit or wasted purchase | Measure drawer or cabinet space first |
| Mixing organizing systems across storage spots | Recreates confusion the project was meant to fix | Apply one consistent order everywhere |
Most of these mistakes share a root cause: skipping a step to save time upfront. In nearly every case, the shortcut costs more time later, either in a repeat purge, a returned organizer that didn’t fit, or a system that quietly falls apart within a few months.
Adapting the System
Organizing Spices for Different Kitchen Types
Everything covered so far assumes a fairly standard kitchen with at least one drawer or cabinet near the stove, but real kitchens vary enormously, and the system above needs small adjustments depending on what you’re working with. Below are the most common kitchen situations and how to adapt the core steps to each.
Rental Kitchens
If you’re renting, avoid any organizer that requires drilling or permanent adhesive that could damage cabinet doors or walls. Freestanding drawer inserts, tension-mounted shelves that wedge between existing shelving without hardware, and countertop turntables are all fully portable, meaning the entire system, jars included, can move with you to the next apartment without leaving a trace. Removable hook-and-loop mounting strips are a reasonable middle ground for lightweight wall racks, since they hold securely during use but peel away cleanly when you move out.
Small or Galley Kitchens
When counter and cabinet space is at a premium, vertical space becomes your best friend. A narrow wall-mounted rail installed on an otherwise unused strip of wall between an upper cabinet and the counter, or a slim door-mounted rack on the inside of a pantry door, can hold a full working set of spices without consuming any shelf or drawer real estate at all. In these kitchens, it’s especially worth trimming your keep pile aggressively during the audit step, since every jar you keep is competing for genuinely scarce space.
Large Kitchens With a Dedicated Pantry
If you have the luxury of a walk-in or reach-in pantry, resist the temptation to store your everyday spices there instead of near the stove. A pantry is excellent for backstock and bulk containers, exactly as described earlier in this guide, but it’s too far from your primary cooking surface to serve as your working set. Use the two-tier approach: a small, curated selection at the stove, and the fuller collection, including backstock and less-frequently used specialty spices, in the pantry.
Shared or Family Kitchens
When multiple people cook in the same kitchen, consistency matters even more than it does for a single cook, since everyone needs to be able to find and correctly replace jars. Clear, large-print labels help here more than in a single-cook kitchen, and it’s worth involving everyone who cooks regularly in agreeing on the organizing order, whether that’s alphabetical or by category, so the system doesn’t quietly get reorganized by different family members using different logic over time. A shared restock list, whether on paper or a shared phone note, also prevents the common family-kitchen problem of three people independently noticing the cumin is low and nobody actually buying more.
| Kitchen Type | Recommended Format | Key Adjustment |
|---|---|---|
| Rental | Freestanding insert or turntable | Avoid drilling or permanent adhesive |
| Small / Galley | Wall rail or door-mounted rack | Trim collection aggressively during audit |
| Large with Pantry | Two-tier: stove zone + pantry backstock | Keep working set small and close to stove |
| Shared / Family | Any format, with clear labeling | Agree on one system with all household cooks |
Planning the Project
Budget-Friendly vs. Premium Approaches
Spice organization can be done on nearly any budget, and it’s worth being honest about the tradeoffs before you start buying supplies, since the internet’s most photogenic spice cabinets often represent a fairly significant investment in matching glass jars and premium hardware.
A budget approach leans on what you already own wherever possible. Reuse existing jars that are already roughly uniform, print labels on a home printer and adhere them with clear packing tape for durability, and choose a simple, low-cost drawer insert or a set of inexpensive stackable bins rather than a premium branded organizer system. This approach can achieve nearly all of the functional benefits of organization, easy visibility, clear labeling, logical order, for a fraction of the cost of a full jar replacement.
A premium approach prioritizes uniformity and long-term durability: matching glass jars purchased as a full set, a label-maker or professionally printed label sheet for a completely consistent look, and a purpose-built organizer system sized precisely to your storage space. This route costs more upfront but tends to look and function more consistently over time, since matching jars stack and nest more predictably than a mixed set of reused containers.
Budget approach
- Reuses existing jars and containers
- Lower upfront cost
- Faster to start, since less shopping is required
Premium approach
- Fully uniform look and stacking
- Higher durability over years of use
- Better resale or move-friendly system
Most people land somewhere in the middle: a matching set of jars for the everyday working collection, paired with a lower-cost bin or basket for backstock and rarely-used specialty spices. This hybrid keeps the visible, high-traffic part of the system looking clean and consistent while keeping overall cost reasonable.

Popular pick: Set of 24 matching square glass jars with bamboo lids and a printable label sheet included, sized for standard drawer inserts.
Check Price on AmazonBefore You Start
Supplies Checklist
Gathering everything before you start keeps the project moving in one session instead of stalling out on a supply run halfway through. Here’s what a typical spice organization project requires, broken into what’s essential and what’s optional depending on how far you want to take the system.
| Supply | Purpose | Essential or Optional |
|---|---|---|
| Matching jars | Uniform storage for decanted spices | Optional, but high-impact |
| Funnel | Transfers spice from old packaging without mess | Essential if decanting |
| Labels or label maker | Identifies each jar clearly | Essential |
| Drawer insert or shelf organizer | Physically arranges jars in your chosen format | Essential |
| Measuring tape | Confirms organizer fits your space | Essential before purchasing hardware |
| Airtight backstock containers | Stores bulk and reserve spices | Optional, recommended for bulk buyers |
| Damp cloth | Wipes down cabinet or drawer before reloading | Essential |
| Trash bag or compost bin | Collects spices from the toss pile | Essential |
Set aside a block of uninterrupted time for the initial audit and decanting steps rather than trying to fit them into small gaps between other tasks. Most home kitchens with a moderate collection, roughly 30 to 50 spices, take somewhere between two and four hours from start to finish when done in one sitting, including cleaning the cabinet or drawer itself before reloading it.
It’s worth wiping down the interior of whatever cabinet, drawer, or shelf you’re organizing before placing the new system inside. Spice residue, dust, and the occasional sticky ring from an old bottle tend to accumulate over the months or years the space went unorganized, and starting with a clean surface makes the finished result feel noticeably more put-together, even though it’s a step that’s easy to skip.
Longer-Term Thinking
Sustainability & Refilling Your System
Once jars are decanted and labeled, refilling them is a much smaller task than the original setup, but it’s worth thinking through in advance so you’re not improvising every time a jar runs low. Buying spices in refill pouches or bulk bins, where available, and simply topping up your existing jars produces far less packaging waste than buying a brand-new small jar every time, and it’s frequently cheaper per ounce as well.
Many bulk grocers, co-ops, and specialty spice shops sell spices by weight from bins or in refill pouches specifically designed for this purpose. If you have access to one, bringing your empty decanted jar and refilling it directly, or refilling a backstock container and transferring from there, closes the loop on the system in a way that a constant stream of small single-use jars never quite does.
If bulk refilling isn’t available locally, buying the largest reasonable quantity of your most-used spices, split between one jar in your everyday zone and the remainder in backstock, achieves a similar effect: fewer total packages purchased over a year, and less frequent disruption to your organized system every time you run out of something.
For spices you use rarely, the calculus flips. Buying the smallest available quantity, even if it costs slightly more per ounce, avoids the common outcome of a large jar sitting mostly full and slowly losing potency for years because it’s only used once or twice a year. Matching purchase quantity to actual usage rate is a small habit that keeps both your budget and your system healthier over time.
When Things Go Sideways
Troubleshooting a System That Stops Working
Even a well-designed spice system can start to fail after a few months, and it’s worth diagnosing why rather than assuming the whole approach was wrong. Most breakdowns trace back to one of a small number of root causes, and each has a specific fix rather than requiring a full redo.
“I keep buying duplicates.”
This almost always means visibility has broken down somewhere, either jars have drifted out of their assigned order so you can’t quickly confirm what you have, or backstock and everyday jars have gotten mixed together so you’re checking the wrong location before a shopping trip. The fix is a five-minute reset: put every jar back in its assigned spot, and separate backstock from the everyday zone if they’ve merged.
“New spices never make it into the system.”
This is almost always a friction problem. If decanting a new spice requires finding a matching jar, printing a label, and finding it a spot, that’s too many steps to complete in the moment right after a grocery trip. Keep a small stash of empty labeled-but-blank jars and a pen on hand specifically for this purpose, so adding a new spice takes under a minute rather than becoming a deferred task that never gets done.
“The drawer looks chaotic again within weeks.”
Check whether the organizing order (Step 5) actually matches how you cook. If you set up alphabetical order but actually search by cuisine when you’re cooking, you’ll unconsciously start regrouping jars by feel, which looks like disorganization but is really a mismatch between the system’s logic and your natural search pattern. Switching to match your actual behavior, rather than fighting it, usually resolves this faster than reinforcing the original order.
“Labels are peeling or fading.”
Cheap paper labels and ink that isn’t water- or grease-resistant are the usual culprits, especially in a system stored near a stove where steam and splatter are common. Switching to a laminated label sheet, a label-maker with weatherproof tape, or a paint pen on a chalkboard-style label typically solves this permanently rather than requiring repeated relabeling.
In nearly every case, a failing system is fixable with a targeted adjustment rather than a full rebuild. Treat the first few months after setup as a tuning period: notice what’s causing friction, and adjust that one specific element rather than assuming the whole approach needs to change.
A Common Edge Case
Organizing Homemade Blends and Rubs
If you mix your own spice blends, whether it’s a go-to taco seasoning, a barbecue rub, or a curry powder built from individual spices, those blends deserve their own place in the system rather than being treated as an afterthought stirred together in whatever container is nearest. Homemade blends have two organizing needs that store-bought spices don’t: recipe tracking and batch dating.
Keep a small card, note, or label on the jar itself listing the ratio or recipe used to make the blend. This matters more than it might seem, since a blend you loved six months ago is nearly impossible to recreate from memory once the jar is empty, and “figure it out again from scratch” is a common reason home cooks abandon a homemade blend they otherwise liked. A simple index card taped inside a nearby cabinet door, or a note in your phone linked to the label, solves this permanently.
Batch dating matters because blends made from a mix of ground spices tend to lose balance faster than any single spice would on its own; some components fade quicker than others, so a blend that’s a year old may taste noticeably different, and not necessarily worse, just unbalanced, compared to when it was freshly mixed. Treat homemade blends with a shorter expected shelf life than individual spices, generally three to six months for a blend used regularly, and make smaller batches more often rather than one large batch that sits for a year.
Physically, homemade blends fit into the same jar-and-label system as everything else, though it’s worth grouping them together in one area of your storage rather than alphabetizing them alongside single spices, since you’ll typically reach for “my rub” or “my blend” by name rather than by its first ingredient. A small dedicated section labeled simply “Blends” or “Rubs” within your broader alphabetical or category system keeps them easy to find without breaking the logic of the rest of the collection.
Short On Time
A Quick-Start Version for Time-Crunched Cooks
Not every kitchen has a free afternoon to dedicate to the full seven-step process, and a partial version of this system still beats no system at all. If you only have thirty minutes, focus on three things: pull everything out and toss anything with no smell left, group what remains by rough category directly in your existing containers, and turn every label so it faces forward or upward, whichever matches how you’ll actually see the jar.
This abbreviated version skips decanting into matching jars and skips installing new hardware, but it captures the two changes that matter most for daily usability: removing dead weight from the collection, and making sure you can actually read what you own without pulling every jar out one at a time. It’s a reasonable starting point that you can build on later, whether that’s next weekend or next season, once decanting and a proper insert become practical.
If you’re planning to eventually do the full version, this quick pass is also useful preparation, since it gives you an accurate count of what you’re keeping, which is exactly the number you’ll need when choosing a drawer insert or shelf organizer sized to your actual collection rather than guessing.
Quick Answers
Frequently Asked Questions
How often should I reorganize my spice cabinet?
A full reorganization is rarely necessary more than once every couple of years if you maintain the system with small check-ins every few months. The initial audit and setup is the heavy lift; after that, it’s mostly about catching drift early. Think of the check-ins as maintenance rather than a project, similar to wiping down a stovetop, small and frequent rather than saved up into one large task.
Should I store spices near the stove?
Store them near the stove for convenience, but not directly above or beside the burners. Heat is one of the fastest degraders of spice potency, so a drawer or cabinet a step or two away from direct heat is the sweet spot between accessibility and preservation.
What size jars should I use for decanting?
Four-ounce jars work well for most everyday spices and fit standard drawer inserts efficiently. Spices you use in larger quantities, like paprika or cumin in a household that cooks a lot of chili or curry, may warrant an 8-ounce jar to reduce how often you’re refilling from backstock.
Is it better to buy whole spices or pre-ground?
Whole spices last considerably longer and generally offer more flavor when freshly ground, since grinding releases aromatic oils right before use rather than months or years earlier. If you cook with whole spices regularly, a dedicated grinder makes the process fast enough to be practical for everyday cooking; our best spice grinder guide compares options for different budgets and spice types.
How do I know if a spice has gone bad?
Spices rarely spoil in a way that makes them unsafe, but they do lose potency. Rub a small amount between your fingers and smell it; if the aroma is faint or absent, it will contribute little flavor even though it’s technically still safe to use.
What’s the best material for spice jars: glass or plastic?
Glass is generally the better choice for long-term storage, since it doesn’t absorb odors or leach any smell into the spice over time, and it doesn’t scratch or cloud the way plastic can after repeated washing.
Should spices be organized alphabetically or by category?
Both work well; alphabetical order tends to suit larger collections since it’s the fastest to search without needing to remember a categorization system, while category grouping suits cooks who plan meals around specific cuisines and want to grab a whole flavor profile at once.
How much does it cost to fully organize a spice cabinet?
Costs vary widely depending on collection size and storage format, but a basic decanting-and-labeling project using budget jars and a simple drawer insert can be done affordably, while premium organizer systems and matching glass jars for a large collection cost more upfront and pay off in durability over time. As a rough guideline, a modest collection of twenty to thirty spices can be fully decanted and organized on a tight budget, while a larger collection with premium matching jars represents a bigger investment that many cooks choose to spread out over a few paychecks rather than buying all at once.
Can I organize spices without buying any new containers?
Yes. You can apply the same audit, labeling, and ordering principles to your existing bottles without decanting. The organization will still improve significantly, though a drawer or shelf will look and function less uniformly than one with matching jars.
Where should I store spices in a small apartment kitchen with no extra cabinet space?
A countertop turntable or a small wall-mounted rail holding your most-used spices is usually the most space-efficient option when cabinet space is limited, since it uses vertical or unused wall space rather than competing for shelf room with cookware and pantry items.
How do I keep track of what spices I need to restock?
A running list on your phone or a magnet notepad on the fridge, updated whenever you notice a jar getting low during cooking, is the simplest way to avoid running out mid-recipe and to batch your restocking into a single shopping trip.
Do spice blends need to be stored differently than single spices?
Not structurally, but blends tend to lose their balance faster than single spices since some components fade quicker than others. Treat blends with a slightly shorter shelf-life expectation and label them with the purchase or mix date so you know when to refresh them.
Your Spice Cabinet, Finally Under Control
A working spice system isn’t about having the fanciest jars on the internet — it’s about being able to reach for exactly what you need, every time you cook, without digging through a drawer of mismatched bottles. Start with the audit, build outward from there, and let the system evolve as your cooking does. Whether you tackle every step this weekend or work through the quick-start version first and circle back later, the goal is the same: a kitchen where seasoning a dish is the easy part of cooking, not the frustrating part.
Shop Spice Organizers on Amazon