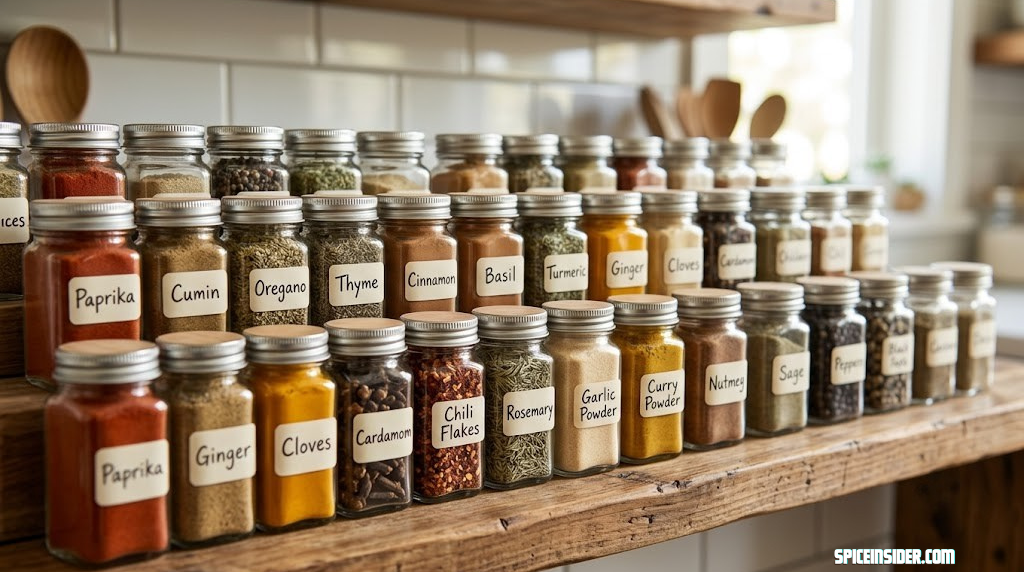
How to Label Spice Jars So They Actually Stay Readable
A complete, method-by-method walkthrough for labeling your spice collection — from quick chalkboard markers to printed labels that survive years of steam, grease, and daily use.
Why Labeling Your Spice Jars Actually Matters
Every home cook eventually hits the same wall: a cabinet full of nearly identical jars, half of them holding spices that look almost the same in dim kitchen light. Smoked paprika and cayenne. Cumin and coriander. Garam masala and curry powder. Without a label, you’re left unscrewing lids and sniffing your way through a guessing game while dinner sits half-cooked on the stove. Labeling isn’t a decorative afterthought — it’s the single change that turns a chaotic spice drawer into a system you can actually cook from.
There’s also a practical safety angle that gets overlooked. Some ground spices, once decanted into matching jars, are genuinely difficult to tell apart by color or texture alone, especially under warm incandescent lighting. Chili powder blends and unsweetened cocoa can look startlingly similar in a pinch. A missing or faded label means you’re relying on memory, and memory is the first thing to fail when you’re cooking three dishes at once. A clear label removes that risk entirely, and it does it in about ten seconds per jar.
There’s a freshness argument too. Ground spices lose potency gradually, and whole spices last considerably longer, but almost nobody remembers exactly when they bought the cumin seed sitting in the back row. A label with a fill date solves this without requiring you to keep a separate spreadsheet. Glance at the jar, see the date, and know instantly whether it’s time to restock or whether it’s still got plenty of life left. If you haven’t yet settled on a broader storage approach, it’s worth pairing this labeling project with a wider look at how to organize spices in your kitchen, since the two projects reinforce each other — a good system needs both a home for every jar and a label that tells you what’s inside it.
Finally, there’s the simple pleasure of a cabinet that looks intentional. A shelf of uniform jars with clean, matching labels reads as calm and organized every time you open the door, and that small visual order has a way of making the whole kitchen feel more under control. This guide walks through every practical way to get there, starting with the cheapest and fastest methods and working up to labels that are genuinely permanent.
It’s also worth acknowledging why so many people put this project off in the first place. Labeling a whole spice cabinet feels like it should take an entire weekend, and that mental estimate is usually what stops people from starting at all. In reality, once you’ve picked a single method and gathered the handful of supplies it needs, a typical home collection of twenty to forty jars can be fully labeled in one sitting — closer to an hour or two than a full weekend. The barrier isn’t the labeling itself; it’s decision fatigue over which method, which font, and which layout to commit to. This guide is built to remove that decision fatigue by walking through each option in enough detail that you can pick one with confidence and get moving.
There’s also a resale and gifting angle worth mentioning briefly. Well-labeled spice jars are a genuinely appreciated homemade or repackaged gift, whether you’re portioning out a spice blend for a friend or setting up a shared kitchen with a roommate. A clear, legible label turns a plain jar of seasoning into something that looks deliberate and cared-for, which matters more than most people expect the first time they hand one over.
Tools & Supplies You’ll Need
Before diving into any specific method, it helps to gather supplies so you’re not stopping mid-project to run to the store. Below is a general supply list; each method further down calls out anything extra it needs.
| Supply | Used For | Approx. Cost |
|---|---|---|
| Clean, empty spice jars | The surface you’re labeling | Varies — often reused |
| Isopropyl alcohol + cotton pads | Degreasing jar surfaces before labeling | Low |
| Fine-tip oil-based paint marker | Chalkboard-style and glass labels | Low |
| Printable adhesive label sheets | Printed labels | Low–Moderate |
| Laminate sheets or clear packing tape | Waterproofing printed labels | Low |
| Glass etching cream or engraving tool | Permanent engraved labels | Moderate |
| Painter’s tape or a ruler | Keeping lines straight | Low |
| Rubbing alcohol wipes | Removing old labels before relabeling | Low |
If you’re starting a labeling project from scratch, it’s usually because you’re also standardizing your jars for the first time. If that’s you, it’s worth reading through a roundup of the best spice organizers before you commit to a jar shape, since some organizer systems only work with specific jar dimensions, and it’s much easier to pick labels that match your jars than to redo labels after switching organizers later.
A quick note on quantity: it’s almost always cheaper per-unit to buy supplies in bulk once you know which method you’re going with, rather than buying just enough for a first test batch. A single fine-tip paint marker, for instance, can comfortably label 150 to 200 jars before running dry, which is more than enough for even a serious spice collection with room to grow. The same logic applies to adhesive label sheets — most printable sheet packs are sized for dozens of labels per sheet, so a single pack usually covers an entire kitchen with sheets left over for future relabeling.
It’s also worth thinking about whether you’re labeling jars you already own or buying new jars as part of this project. If you’re standardizing on new jars, look for a consistent lid material — metal lids generally hold paint-marker ink better than plastic lids, since plastic tends to have a slicker, less porous surface that ink can slide around on before it cures. Glass jar bodies, meanwhile, are the most forgiving surface for both printed labels and etching, since they’re perfectly smooth and non-porous once degreased.
If part of your setup involves decanting freshly ground spices into small jars rather than buying them pre-ground, it’s worth pairing this project with a look at the best spice grinders, since freshly ground spices tend to lose potency faster than store-bought ground spice, which makes an accurate fill date on the label even more important than usual.

Fine-Tip Oil-Based Paint Markers
Waterproof, opaque, and smudge-resistant on glass and metal lids — the workhorse tool for almost every method in this guide.
Check Price on AmazonMethod 1: Chalkboard-Style Labels
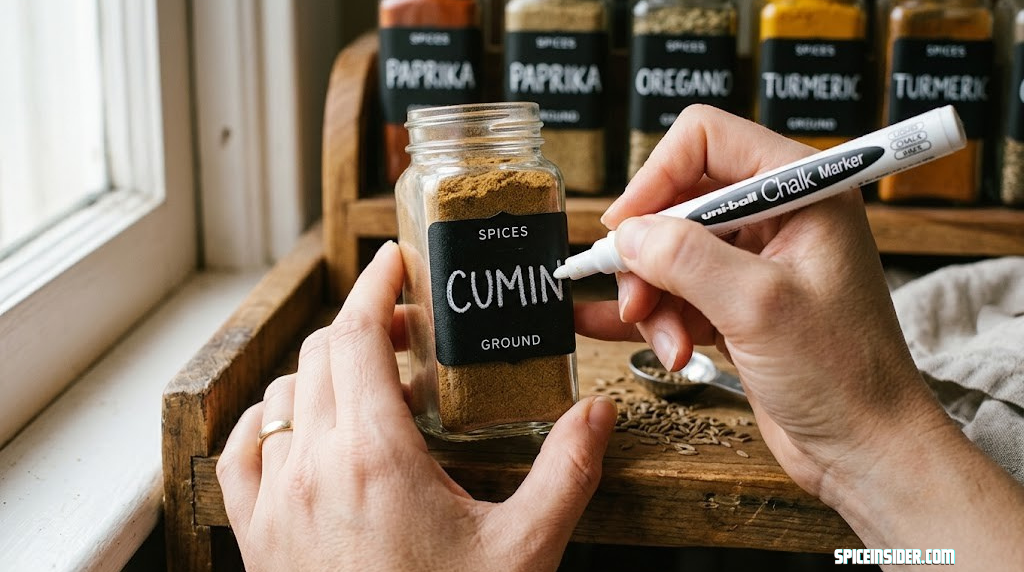
This is the fastest, cheapest, and most forgiving method on this list. It works on chalkboard label stickers, on jars with a chalkboard-painted panel, or directly on a matte lid using an oil-based paint marker that mimics chalk. It’s the method most people start with, and for good reason — it takes about a minute per jar and requires no printer, no cutting, and almost no setup.
What makes this method so forgiving is that mistakes are cheap to fix. If a word comes out crooked or a letter smudges before it cures, a cotton pad with a little rubbing alcohol wipes the ink away cleanly on most matte and chalkboard-style surfaces, letting you start over in seconds rather than throwing away a ruined label sheet. That low-stakes quality is exactly why this method tends to suit people who are still deciding on a final jar layout or organizing system — you can label, live with it for a week, and adjust without waste.
Clean and Dry the Labeling Surface
Wipe the lid or chalkboard sticker with a cotton pad dampened in isopropyl alcohol. This removes the thin layer of kitchen grease and dust that builds up even on brand-new jars, and it’s the single biggest reason chalkboard labels smudge or fail to adhere in the first place. Let the surface dry completely — even 30 seconds of extra drying time makes a visible difference in how crisp your lettering turns out. If the jar is brand new and still has manufacturer stickers or price tags on it, remove those first and clean off any leftover adhesive before you start, since paint marker applied over sticker residue will never fully bond and tends to peel within days no matter how carefully you write.
Write the Spice Name in Light Pencil First (Optional but Recommended)
If your handwriting tends to drift or you want centered, evenly sized lettering across a whole shelf of jars, lightly sketch the word in pencil first, or use a strip of painter’s tape as a horizontal guideline. This step is optional for confident handwriting, but it’s the difference between a shelf that looks curated and one that looks rushed, especially once you have thirty or forty jars sitting side by side.
Trace With the Paint Marker and Let It Cure
Go over your pencil guide (or write freehand) with an oil-based paint marker, holding it at a slight angle and applying light, even pressure. Oil-based markers need real curing time — most brands recommend letting the ink sit undisturbed for at least an hour, and ideally overnight, before the jar goes back into regular handling. Skipping this step is the number one reason chalkboard labels wear off within a few weeks; the ink looks dry to the touch long before it’s actually cured. A useful habit is to write all your labels in one batch, lay the jars lids-up on a towel overnight, and only start placing them back in the cabinet the next morning. Batching the curing time this way means you’re not tempted to handle any single jar too early just because you happen to need that spice for dinner.
Pros and Cons of Chalkboard-Style Labels
Pros
- Fastest method — no printer or cutting required
- Fully erasable and rewritable with rubbing alcohol
- Very low cost, especially at scale
- Rustic, uniform look that suits open shelving
Cons
- Depends on handwriting consistency
- Can smudge if handled before fully cured
- Less crisp for long ingredient names or blends
- Not ideal if you want barcodes or printed icons

Reusable Chalkboard Sticker Labels
Peel-and-stick chalkboard panels that wipe clean with a damp cloth — perfect for a labeling system you plan to update often.
Check Price on AmazonMethod 2: Printed Adhesive Labels
Printed labels are the method most people land on once handwriting stops feeling scalable — say, once you’re relabeling an entire cabinet at once. They’re the most consistent-looking option, they can include extra information like a fill date or a short recipe note, and modern label templates make it easy to batch-print dozens of jars in one pass.
This method also scales best if more than one person shares the kitchen. A printed template guarantees every jar looks identical regardless of who actually applies the label, which sidesteps the handwriting-consistency issue that comes up with chalkboard-style labels in a shared household. It’s also the easiest method to redo entirely from scratch later, since your template file is saved and reusable — if you ever switch jar brands or want to refresh the whole look, you’re reprinting from an existing design rather than starting over letter by letter.
Choose or Design a Label Template
Start with a template sized to your jar lids or jar fronts — most spice jar lids fall in a 1.5 to 2 inch diameter range, while jar-front labels tend to run 2 by 3 inches. Free label design tools let you set a consistent font, size, and layout, then swap out just the spice name for each jar. Keep the design simple: a spice name in a clear font, optionally paired with a small icon or a fill-date line, is almost always more legible on a small jar than a busy, decorative design.
Build the template once as a master file with placeholder text, then duplicate it for every spice rather than designing each label individually from a blank page. This one habit is what separates a labeling session that takes twenty minutes from one that takes two hours, since you’re only ever changing a single line of text on each duplicate rather than rebuilding the layout, spacing, and font choices from scratch every time.
Print on Adhesive Label Sheets
Print your finished template onto adhesive label sheets rather than plain paper — regular paper won’t survive contact with steam or oil splashes, even with tape over it. Print a test sheet on plain paper first to check alignment and font size before committing to the adhesive sheet; this single check prevents the most common printing mistake, which is discovering your text is slightly too large for the die-cut circle only after you’ve already printed forty labels.
It’s also worth checking your printer’s settings for an “actual size” or “100% scale” option before printing to adhesive sheets — many print dialogs default to a “fit to page” scaling mode that shrinks or stretches your template slightly to fill the page, which throws off alignment with pre-cut die-cut sheets even when your original design file was sized correctly.
Apply and Seal the Label
Press the label onto a clean, dry jar surface, working from the center outward to push out any air bubbles, then run a fingernail or credit card edge along it to fully bond the adhesive. If your labels aren’t already laminated, cover them with a layer of clear packing tape or a laminate sheet cut slightly larger than the label — this single step roughly triples how long a printed label survives near a stovetop, since it’s steam and grease exposure, not time itself, that causes printed ink to fade and peel.
Give freshly applied labels a few minutes before wiping the jar down, even if the adhesive feels fully set — the bond between label and glass continues to strengthen for the first hour or so after application, and an early wipe-down with a damp cloth is a common way a corner starts lifting before the label has had a chance to fully settle.
Pros and Cons of Printed Adhesive Labels
Pros
- Extremely consistent across an entire collection
- Can include fill dates, icons, or short notes
- Easy to batch-produce with a template
- Wide range of pre-designed styles available
Cons
- Requires a printer and adhesive sheets upfront
- Needs a laminate layer to survive steam and grease
- Harder to edit once printed and applied
- Removing old labels can leave adhesive residue

Waterproof Printable Label Sheets
Pre-cut, laminated adhesive sheets designed to survive steam and oil — just print, peel, and press.
Check Price on AmazonMethod 3: Engraved and Etched Labels
Engraved labels are the slowest method on this list to set up, but they’re also the only truly permanent option — nothing short of the jar breaking will remove them. This method suits people who’ve already settled on a fixed jar shape and organizing system and don’t expect to swap spices between jars often, since etched text can’t be edited once it’s done.
This method also tends to appeal to people setting up a kitchen they expect to stay in for years, or building a set of jars specifically meant to be handed down or gifted as a matched set. Because the etching becomes part of the glass itself, engraved jars can go through a dishwasher indefinitely without any risk of the label fading, curling, or lifting at the edges — a real advantage over both of the other methods if daily dishwasher use is part of your routine.
Mask the Design With Etching Stencil or Vinyl
Cut or apply a stencil in the shape of your spice name directly onto the clean glass surface, pressing down firmly along every edge so etching cream can’t seep underneath. Vinyl letter stencils in a simple sans-serif font work well here since fine serifs and thin strokes are harder to cut cleanly and etch evenly. If you’re cutting your own stencils with a craft cutting machine rather than buying pre-made letter stickers, do a test cut on scrap vinyl first to confirm your font size actually holds together as individual small letters — very thin strokes on tiny lettering can tear during the cutting or weeding process before they ever reach the jar.
Apply Etching Cream and Rinse
Following the product’s instructions, spread a thick, even layer of etching cream over the exposed stencil area and let it sit for the recommended time — usually just a few minutes. Rinse thoroughly under running water, peel away the stencil, and you’re left with a frosted, permanently etched name that reads as a subtle, upscale texture rather than a printed label. Work in a well-ventilated space and wear gloves while handling etching cream, since it’s a mild acid formulated specifically to dissolve the surface of glass — the same property that makes it effective is exactly why it shouldn’t contact skin for extended periods.
Pros and Cons of Engraved Labels
Pros
- Completely permanent — survives washing indefinitely
- Elegant, upscale look on clear glass jars
- Never fades, smudges, or peels
- No ongoing supply cost once jars are done
Cons
- Cannot be edited or removed once etched
- Most time-consuming method to set up
- Requires careful handling of etching chemicals
- Not practical for jars you plan to reuse for different spices
Where to Put the Label: Lid, Front, or Back
Label placement depends entirely on how your jars are stored. A drawer full of jars lying flat needs a completely different label position than jars standing upright on an open shelf, and getting this wrong is one of the most common reasons a labeling project ends up frustrating rather than helpful.
| Placement | Best For | Considerations |
|---|---|---|
| Top of Lid | Drawer storage, flat-lying jars | Must be readable from directly above; keep text short |
| Jar Front | Shelf storage, cabinet doors, spice racks | Most visible option when jars are viewed at eye level |
| Jar Back | Deep cabinets where jars are pulled forward to view | Rarely used alone; better as a secondary label |
| Both Lid and Front | Mixed storage (some jars flat, some upright) | Most flexible but doubles labeling time |
If you store your jars in a drawer-style organizer, lid labels are non-negotiable, since the jar front is invisible until you physically lift the jar out. If you keep spices on open shelving or in a door-mounted rack, front labels are far more useful, since that’s the surface facing you as you scan the shelf. For a deeper look at which storage style suits different kitchen layouts, this roundup of spice organizers breaks down drawer inserts, tiered shelves, and door-mounted racks side by side.
One detail that trips people up is orientation within a drawer. Even with a lid label in place, a flat drawer with jars scattered at random angles still takes longer to scan than one where every label faces the same direction. If your drawer organizer allows it, take the extra few seconds to rotate each jar so the label reads right-side-up from the angle you’ll be standing at when you open the drawer — it sounds like a small thing, but across forty jars it adds up to a meaningfully faster search every single time you cook.
For deep cabinets specifically, consider a small secondary label on the jar’s back or side, positioned so it’s visible from the angle you’d see while reaching in rather than pulling the jar all the way out. This isn’t necessary for shallow, single-row shelves, but in a deep cabinet where jars sit two or three rows back, a side label often ends up being the one you actually rely on day to day, since the front label is frequently blocked by the row of jars in front of it.

Tiered Drawer Spice Organizer
Angled tiers keep every lid label visible at a glance the moment you open the drawer.
Check Price on AmazonChoosing a Font and Layout That Stays Readable
It’s tempting to reach for a decorative script font because it photographs well, but script fonts are consistently the hardest to read at a glance across a shelf, especially in dim cabinet lighting or from an angle. A clean sans-serif in all capitals, set at a large enough size to read from about two feet away, will always outperform a stylized font for actual daily use.
Keep the layout hierarchy simple: the spice name should be the largest and boldest element on the label, full stop. Anything else — a fill date, a small icon, a “best by” note — should be noticeably smaller and placed below or beside the name, never competing with it for attention. If you’re labeling a spice blend rather than a single spice, consider a two-line layout with the blend name on top and a short ingredient note underneath, since blend names alone (like “Ras el Hanout” or “Za’atar”) aren’t self-explanatory to everyone in the household.
Contrast matters just as much as font choice. Dark lettering on a light label, or light lettering on a dark chalkboard-style panel, will always be easier to read at a glance than a mid-tone color combination, even one that photographs beautifully for a kitchen tour. If you’re designing a printed template, resist the temptation to use a soft pastel text color against a similarly soft background — it looks refined in isolation but becomes genuinely hard to read once the jar is sitting in a dim cabinet or slightly shadowed by the jar next to it.
Spacing between letters and lines deserves a mention too. Tight letter spacing on a small label can cause words to blur together at a glance, especially with condensed fonts that are designed to fit more text into less horizontal space. A little extra letter spacing — sometimes called tracking — on an all-caps label noticeably improves how quickly the word registers, which matters more than it might seem when you’re scanning a whole shelf of jars looking for one specific spice mid-recipe.
| Font Style | Readability at a Glance | Best Use Case |
|---|---|---|
| Bold sans-serif, all caps | Excellent | Everyday spices, high-traffic shelves |
| Simple serif, title case | Good | Decorative kitchens, open shelving on display |
| Script or cursive | Poor | Occasional-use jars, decorative gift jars only |
| Hand-lettered (chalkboard style) | Good, if consistent | Rustic kitchens, DIY-friendly systems |
Making Labels Survive Heat, Steam, and Grease
A kitchen is one of the harshest environments in the house for anything paper-based or ink-based. Steam from boiling pots condenses on nearby surfaces, oil splatters travel further than most people expect, and jars stored near a stove or oven experience real temperature swings throughout the day. A label that looks perfect on day one but peels within a month usually failed for one of three predictable reasons.
Common Failure Causes
- Applying a label to a greasy or dusty surface
- Skipping a laminate or sealant layer on printed labels
- Handling oil-based marker labels before they’ve cured
- Placing jars directly beside a stovetop or oven vent
What Actually Works
- Always degrease the surface with alcohol before labeling
- Laminate or tape over printed labels immediately
- Let paint-marker labels cure for at least an hour, ideally overnight
- Keep the everyday jars a few inches back from direct heat
If you live somewhere humid, or your kitchen simply runs warm year-round, engraved or etched labels are worth the extra setup time, since nothing about heat or moisture affects glass that’s already been permanently frosted. For everyone else, a laminated printed label or a fully cured paint-marker label will comfortably last years with normal kitchen use.
Sunlight is a less obvious factor but worth accounting for if any of your jars sit near a window. UV exposure gradually fades both printed ink and some paint-marker pigments over time, independent of heat or moisture. If your spice storage is anywhere near direct sunlight for part of the day, that’s a reasonable argument for choosing darker, more UV-stable pigments for handwritten labels, or for simply relocating the shelf out of direct light if repositioning is an option — the spices themselves also keep their flavor and color longer out of direct sun, so this is a change that helps in more than one way at once.
It’s also worth thinking about how labels hold up to the occasional accidental spill rather than just ambient steam. A jar that gets directly splashed with oil or sauce during cooking needs a genuinely water-resistant label, not just one that tolerates ambient humidity. This is where the laminate step for printed labels earns its keep — a laminated label wipes clean with a damp cloth in seconds, while an unsealed printed label can smear or start lifting from a single direct splash.

Clear Self-Adhesive Laminate Sheets
Seal any printed label against steam, grease, and daily handling in seconds.
Check Price on AmazonColor-Coding Your Spice Collection
Color-coding is an optional layer on top of any labeling method, and it’s especially useful for households where more than one person cooks, or for anyone managing a large collection where scanning names alone starts to feel slow. The idea is simple: assign a consistent color — a colored label border, a colored lid, or a colored dot sticker — to a category of spice, so you can find the right shelf zone before you even read a single word.
| Color | Suggested Category | Example Spices |
|---|---|---|
| Red / Orange | Heat and chili-based | Cayenne, chili powder, smoked paprika |
| Yellow / Gold | Warm, earthy spices | Turmeric, cumin, curry powder |
| Green | Herbs and leafy seasonings | Oregano, thyme, basil, bay leaf |
| Brown / Tan | Baking spices | Cinnamon, nutmeg, allspice, cloves |
| Blue / Neutral | Salts and blends | Sea salt, garam masala, everything blends |
This system works especially well paired with the alphabetical and categorical approaches covered next — color tells you the zone, and the label itself confirms the exact spice, so you’re rarely reading more than a few labels before landing on the right jar.
Color-coding is also genuinely useful for households with young kids helping in the kitchen, or for anyone who’s colorblind to certain hues and finds it easier to sort by a high-contrast marker than by reading small text quickly. A colored ring around the lid, rather than a colored background behind the text, tends to work best in practice — it keeps the spice name itself in a neutral, easy-to-read color while still giving you the quick visual sorting benefit from across the room.
If you decide to add color-coding after your jars are already labeled, small colored dot stickers applied to the edge of the lid are the least disruptive way to retrofit the system — you don’t need to redo any existing label, and dot stickers are cheap enough to experiment with a category system for a week or two before committing to it permanently.
Alphabetical vs. Categorical Organization
Once your jars are labeled, the next decision is how to arrange them, and this is where a lot of otherwise well-labeled collections still feel disorganized. There are two dominant approaches, and each suits a different kind of cook.
Alphabetical System
- Fast to locate any single named spice
- Simple to maintain — new jars just slot into place
- Works well for large, mixed collections
- Ideal for households where multiple people cook
Categorical System
- Groups spices by how you actually cook (baking, grilling, curries)
- Faster for recipe-based cooking sessions
- Requires more upfront planning to define categories
- Can be confusing for guests or less-frequent cooks
Neither system is objectively better — it comes down to how you actually shop and cook. If you tend to follow specific cuisines or recipe collections, categorical grouping (Mexican, Indian, baking, everyday) will feel faster in practice. If you have a large, general collection and often reach for one specific spice by name, alphabetical will save you more time. Whichever you choose, this is the point where a broader organizing plan pays off, and it’s worth reviewing how to organize spices in your kitchen if you haven’t finalized a system yet, since your label design should be built around whichever system you land on.
A hybrid approach is also worth considering, and it’s more common in practice than either pure system. Many home cooks keep a small front-row selection of their five or six most-used everyday spices arranged by frequency of use — salt, pepper, garlic powder, cumin, chili powder — regardless of alphabetical order, simply because those are the jars reached for constantly and don’t benefit from being buried mid-alphabet next to spices used once a season. Everything else in the collection then follows a strict alphabetical or categorical system behind that front row. This isn’t a formal third system so much as a practical adaptation, but it’s worth mentioning because it solves a real frustration: strict alphabetizing can put your most-used spice at the very end of a long shelf just because of where its name falls in the alphabet.
Whatever system you land on, write it down somewhere, even briefly — a sticky note inside the cabinet door listing your category names, or a note on your phone describing the logic. This matters more once other people share the kitchen, since an organizing system that makes perfect sense to you can be completely invisible to someone else unless the logic is made explicit somewhere.
Using Labels to Track Freshness and Rotation
A fill-date label does more than tell you when a jar was last topped up — it’s also the basis for a simple first-in-first-out rotation habit that keeps your whole collection fresher on average. The idea, borrowed from restaurant kitchens, is straightforward: when you restock a spice, the newest jar or refill goes to the back of that spice’s spot, and whatever was already there moves to the front to be used up first.
This only works if the date is actually visible without moving jars around, which is another reason fill-date placement matters as much as the spice name itself. A date tucked onto the back of a jar defeats the purpose, since checking it requires the same amount of digging around that the label was meant to prevent. Keep the date on the same face as the spice name, just smaller and positioned consistently — bottom-right of the label is a common, easy-to-scan choice.
Seasonal spices are a good example of where this habit pays off. Baking spices like cinnamon, nutmeg, and clove often see a burst of use over a few months and then sit untouched the rest of the year. Without a fill date, it’s genuinely difficult to remember whether that jar of nutmeg is from this year’s holiday baking or two years ago’s. With one, the decision of whether to restock or keep using what’s there takes about two seconds.
Common Labeling Mistakes to Avoid
- Labeling before cleaning the jar. Grease and dust under a label are the number one cause of peeling within weeks. A thirty-second wipe with rubbing alcohol before every label goes on is the cheapest insurance against redoing the whole project later.
- Choosing decorative fonts for everyday spices. They look great in photos and read poorly from across a kitchen. Save script and hand-lettered styles for jars you rarely need to identify quickly, and keep your highest-traffic spices in a plain, bold, easy-to-scan font.
- Skipping a fill date. Without one, there’s no way to judge freshness at a glance months later, and you end up relying on smell and color alone, which is a far less reliable test than most people assume.
- Handling paint-marker labels before they cure. Smudged text is almost always a curing-time problem, not a product problem. Give freshly written labels real, undisturbed time before the jars go back into daily rotation.
- Labeling only the lid when jars are stored upright. If the jar stands on a shelf, the front needs the label too, since a lid-only label on an upright jar is essentially invisible unless you physically pick the jar up and look down at it.
- Using inconsistent label sizes across the collection. Mismatched labels are the biggest reason a shelf looks cluttered even when every jar is technically labeled. A single template or a single handwriting size, applied consistently, does more for the finished look than any individual label’s design.
- Not accounting for spice blends. A blend name alone often isn’t enough — add a one-line description of what’s in it, especially for blends that aren’t universally recognized by name across every household.
- Forgetting to relabel after a refill with a different spice. Reusing jars is efficient, but it only works if the label changes along with the contents — an old label on a jar with new contents is arguably more dangerous than no label at all, since it actively tells you the wrong thing with full confidence.
- Placing labels somewhere heat or steam hits directly. A label positioned right above a stovetop vent or directly beside the oven door will wear out faster than the exact same label a few inches further away, regardless of how well it was applied.

Uniform Glass Spice Jar Set
Matching jars make consistent labeling far easier than relabeling a mismatched collection.
Check Price on AmazonKeeping Labels Updated as Your Collection Grows
A labeling system isn’t a one-time project — it’s something you’ll touch every time you add a new spice, run out of one, or discover a blend you didn’t have before. Building in a simple maintenance habit keeps the whole system from slowly falling apart over the following year.
Keep a small stash of blank labels and a marker in the same drawer as your spice jars, rather than in a craft supply box somewhere else in the house — friction is the main reason relabeling gets skipped. When you finish a jar and refill it with something different, treat relabeling as part of the refill process itself, not a separate chore for later. And every six months or so, do a quick pass across the whole shelf checking fill dates; it takes a few minutes and keeps the freshness-tracking benefit of labeling from quietly becoming useless.
If your collection is growing quickly because you’re buying spices in bulk to save money, it’s worth reading how to store bulk spices for guidance on decanting and rotating stock, since a good bulk-storage habit and a good labeling habit are really two halves of the same system.
It also helps to think of relabeling as cheaper and easier the second time around than it was the first. Once you’ve settled on a font, size, and layout, updating a single jar takes a fraction of the time the original project did, since you’re not making design decisions anymore — just applying a system you’ve already worked out. That’s part of why it’s worth investing a little extra care into getting the format right at the start: every future label benefits from that upfront decision-making, and the system only gets faster to maintain the longer you use it.
If you ever find the whole shelf looking inconsistent again after a year or two — a mix of old handwriting, a few printed labels, a couple of bare jars — treat that as a sign it’s time for a full refresh rather than patching individual jars one at a time. A once-a-year reset, done in a single sitting using whichever method you’ve settled on, keeps the entire system looking and functioning like it did on day one.
Designing Labels That Work for Every Cook in the House
It’s easy to design a labeling system around your own eyesight and reading habits and forget that other people will be scanning the same shelf — a partner, a roommate, a visiting relative, or a child old enough to help with dinner prep. A few small design choices make a real difference in how usable your labels are for everyone, not just the person who made them.
High contrast is the single biggest factor. Dark text on a light background, or the reverse, reads faster and more accurately for people with low vision or mild color-vision differences than any mid-contrast combination, regardless of how good it looks in a styled photo. If you’re designing a printed template, running it through a simple contrast check — or just squinting at it from a few feet away — is a quick way to catch a combination that looks fine up close but disappears from normal cabinet-viewing distance.
Font choice matters here too, and it echoes the legibility point made earlier: a clean, moderately bold sans-serif is easier for more people to read quickly than a script or hand-lettered style, particularly for anyone who isn’t a fluent reader of the label’s language or who has any degree of visual impairment. If your household includes a family member who relies on larger text elsewhere in daily life, consider sizing your spice labels a notch larger than you might otherwise, especially the spice name itself.
Finally, think about label height relative to typical eye level in your kitchen. A label positioned too low on a tall shelf, or too high above a shorter member of the household, effectively becomes unreadable without extra effort even if the design itself is perfectly legible. Where possible, keep your most frequently used jars within a comfortable eye-level band for the shortest person who regularly cooks in that kitchen, and reserve the very top or bottom shelves for less frequently used spices that don’t need to be identified at a glance as often.
Label Types Compared
| Method | Setup Time | Durability | Editable | Best For |
|---|---|---|---|---|
| Chalkboard-Style | Very Low | Moderate | Yes, fully | Fast, budget-friendly labeling |
| Printed Adhesive | Moderate | High (with laminate) | Somewhat | Large, consistent collections |
| Engraved / Etched | High | Permanent | No | Fixed, long-term jar systems |
Frequently Asked Questions
What’s the best way to label spice jars without a printer?
An oil-based paint marker directly on the lid or on a reusable chalkboard sticker is the fastest printer-free option. It’s fully erasable, costs very little, and takes about a minute per jar once you’ve got a rhythm going.
Do spice labels need to be waterproof?
Yes, in practice. Kitchens generate steam and grease even away from the stove, and a non-waterproof label — plain paper or unsealed ink — will typically start fading or peeling within a few weeks of regular use.
Should I put the label on the lid or the jar?
It depends on storage. Jars stored flat in a drawer need lid labels since that’s the only visible surface. Jars stored upright on a shelf or in a rack read best with a front label at eye level.
How do I remove old labels before relabeling a jar?
Soak the jar in warm soapy water for a few minutes, then peel the label while it’s still damp. Any leftover adhesive residue comes off easily with a cotton pad and a little rubbing alcohol.
What font size works best for spice jar labels?
Large enough to read clearly from about two feet away — for most standard jars, that means keeping the spice name as the largest element on the label, with any secondary text like a fill date noticeably smaller.
Can I use a regular permanent marker instead of a paint marker?
You can, but standard permanent markers tend to fade faster on glass and smear more easily when wiped with a damp cloth. Oil-based paint markers are specifically formulated to bond to glass and metal and hold up far better over time.
Is it worth adding a fill date to spice labels?
Yes. Ground spices lose potency over time, and a fill date gives you an instant, at-a-glance way to judge whether a spice is still fresh without relying on memory or guesswork.
What’s the most durable labeling method long-term?
Engraved or etched glass labels are the most durable option available, since they become part of the glass itself and can’t peel, fade, or smudge under any normal kitchen conditions.
How do I label spice blends that have long or unfamiliar names?
Use a two-line layout: the blend name on the first line in your largest font, and a short one-line description of the main flavor or use case underneath in a smaller font.
Can printed labels go in the dishwasher?
Generally no, unless they’re fully laminated and applied to a lid that’s kept separate from the wash cycle. It’s safer to hand-wipe labeled jars rather than risk peeling adhesive labels in a dishwasher.
Do I need to label every single jar the same way?
No, but consistency helps. Mixing label styles across a shelf is fine functionally, but a single consistent method — same font, same placement, same size — is what makes a spice cabinet feel organized rather than just labeled.
How often should I check and refresh my spice labels?
A quick check every six months is enough for most kitchens — just enough to catch fading labels, update fill dates, and relabel any jar that’s been refilled with something new.
Final Thoughts: Pick One Method and Start Today
Labeling every jar in your spice cabinet can feel like a bigger project than it actually is. In practice, most kitchens can be fully relabeled in a single afternoon using nothing more than a paint marker and a roll of painter’s tape for straight lines. Start with whichever method matches how permanent you want the result to be — chalkboard-style if you like to change things often, printed labels if you want a polished, consistent look across a large collection, or etched glass if you’re ready to commit for good.
Whatever you choose, the payoff is the same: a cabinet where every jar tells you exactly what’s inside, how fresh it is, and where it belongs — no more guessing, no more sniffing, no more mystery jars pushed to the back of the shelf.
Shop Spice Labeling Supplies on Amazon