How to Clean a Spice Grinder: The Complete Step-by-Step Guide
A grinder that smells like last month’s cumin will ruin this month’s cinnamon. Here’s exactly how to strip out residue, neutralize odor, and keep every grind tasting like the spice you actually put in.
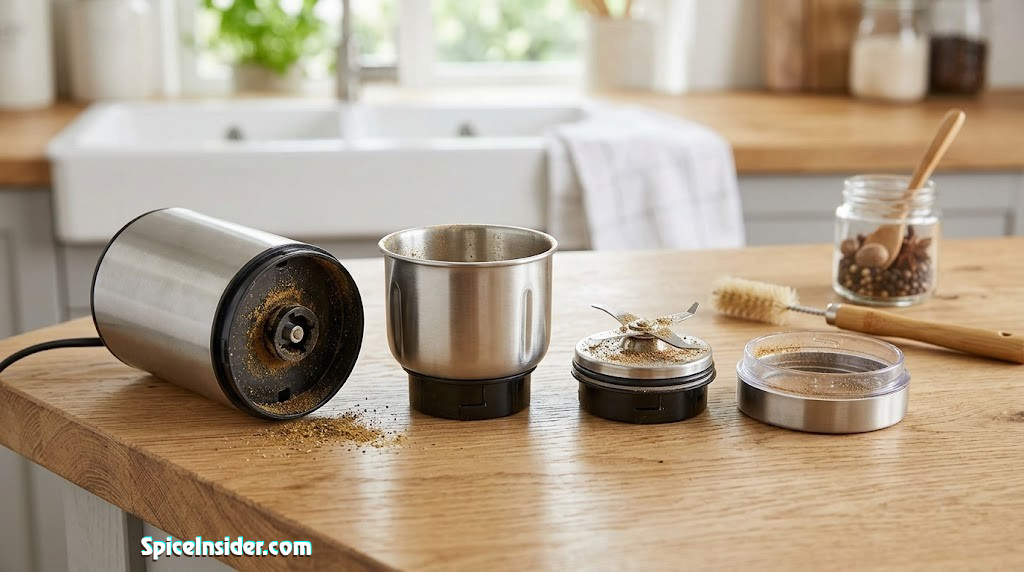
A clean grinder, fully apart and ready for a real reset.
Open the lid of almost any spice grinder that’s been used more than a few times and you’ll find the same thing: a thin, sticky film of turmeric dust, flecks of dried chili, and an oily residue clinging to the walls that no amount of shaking will dislodge. It’s not dirty in the way a dinner plate is dirty. It’s dirty in the way that quietly changes the flavor of everything you grind next, whether you notice it or not.
Cleaning a spice grinder isn’t complicated, but it is easy to do badly — a quick wipe that leaves oils behind, a dunk in soapy water that ruins the motor, or a rinse that never fully dries before the lid goes back on. This guide walks through the entire process, from a 90-second daily reset to a full deep clean, plus how to handle the genuinely stubborn problems: garlic smell that won’t quit, clove oil that’s stained the bowl, and the gunk that builds up around the blade hub where most people never think to look.
If you’re still deciding which machine to buy in the first place, our guide to the best spice grinders covers the models that are actually easy to clean versus the ones that trap residue in hard-to-reach seams.
Section 01
Why Cleaning Your Spice Grinder Actually Matters
A dirty grinder doesn’t just look neglected — it actively works against the flavor you’re trying to create. Essential oils from spices like cumin, clove, and cinnamon are potent and persistent. They coat the inside of the bowl, settle into the blade assembly, and slowly oxidize, turning from fragrant to faintly rancid over a few weeks.
The next spice you grind picks up whatever was left behind. Grind cardamom after cumin without cleaning in between, and you’ll get cardamom with a muddy, savory undertone that has no business being there. This is one of the most common reasons home cooks complain that their spice grinder leaves chunks or tastes “off” — the problem isn’t always the grind, it’s the residue.
The Flavor-Contamination Problem
Spice oils are fat-soluble, which means they don’t evaporate or wash away with a dry brush. Once oil from black peppercorns or chili flakes coats the grinding chamber, it acts almost like a primer coat, picking up and holding onto whatever is ground next. Over time, every spice you grind starts to taste like a vague composite of everything that came before it.
The Hygiene Problem
Trapped moisture and organic residue in a warm kitchen is exactly the kind of environment where mold and bacteria can take hold, especially in grinders that are also used for slightly damp ingredients like garlic or ginger. A grinder that’s never fully cleaned and dried can develop a genuinely unpleasant smell that has nothing to do with the spices themselves.
The Mechanical Problem
Dried spice paste isn’t just a flavor issue — it’s an obstruction. Buildup around the blade hub or between burr plates adds friction, strains the motor, and is one of several causes behind a spice grinder motor burning smell. A clean grinder is a grinder that lasts longer and grinds more consistently.
Section 02
Before You Start: What You’ll Need
You don’t need specialty cleaning products for this. Most of what works best is already in your kitchen. Gather these before you begin so you’re not hunting for a toothbrush mid-clean with turmeric on your hands.
You’ll Want
- A small, soft-bristled brush (an unused toothbrush works perfectly)
- Dry paper towels or a lint-free cloth
- Uncooked white rice or stale bread (for odor and oil absorption)
- A barely damp cloth for wiping exterior surfaces
- Cotton swabs for tight seams and blade edges
- White vinegar or lemon juice (for stubborn odor cases only)
Avoid Using
- Running water directly on the motor base
- Dish soap inside electric grinder bowls that house the motor
- Abrasive scouring pads or steel wool
- Bleach or strong chemical cleaners
- A dishwasher, even on a “gentle” cycle
One more thing worth deciding upfront: are you doing a fast between-spices wipe, or a full reset because the grinder smells or looks genuinely dirty? The two methods below cover both, and most people end up using a mix of the two depending on the week.
If you’re not totally sure your current habits are doing more harm than good, it’s worth a quick read through our spice grinder dos and don’ts before you dive in.
Section 03 — Method 1
The Daily Quick Clean (Between Spices)
This is the clean you should be doing almost every time you switch from one spice to another, especially when moving from something pungent (garlic, cumin, fenugreek) to something delicate (cardamom, fennel, dried citrus zest). It takes under two minutes and prevents 90% of cross-contamination issues before they start.
Empty the Bowl Completely
Unplug the grinder if it’s electric, then tip the bowl upside down over a trash bin or compost container and tap the base gently. Most loose spice will fall free immediately.
Run a “Cleaning Batch” Through It
Add a tablespoon of plain, uncooked white rice (or a small torn piece of stale bread) into the empty bowl and run the grinder for 10–15 seconds. The rice acts like a dry sponge, scrubbing the blade and walls while absorbing oil and lingering odor as it’s pulverized.
Discard the ground rice afterward — it’s now full of whatever residue it pulled off the walls, so don’t cook with it.
Wipe the Bowl Dry
Use a dry paper towel to wipe the inside of the bowl in a circular motion, pressing into the corners near the blade hub where powder likes to collect. This step alone removes most surface dust that the rice didn’t pick up.

Want a grinder that’s actually easy to clean?
Removable stainless bowls and tool-free blade assemblies make the daily clean above take under a minute.
Check Today’s Price on AmazonSection 04 — Method 2
The Deep Clean (Full Disassembly)
Do this every two to four weeks, or any time the grinder has visible buildup, a lingering smell, or hasn’t been cleaned in longer than you’d like to admit. Unlike the quick clean, this gets into the seams, the underside of the blade, and the lid gasket — the places where flavor actually hides.
Unplug and Disassemble
Unplug the unit, then separate the bowl/blade assembly from the motor base. Most grinders twist-lock or simply lift off — check that the base never gets wet in any of the following steps.
Brush Out Dry Debris First
Before any liquid touches the bowl, use the dry brush to loosen and sweep out caked powder, especially around the base of the blade where it meets the bowl floor. Doing this dry first means the wet-cleaning step that follows isn’t just turning powder into paste.
Hand-Wash the Bowl (Not the Motor)
If your grinder’s bowl is removable and labeled water-safe, wash it in warm water with a small amount of mild dish soap, using the soft brush to work into corners. If the blade is fixed to the bowl (non-removable), wipe with a soapy damp cloth instead of submerging — check your model’s manual if you’re unsure.
Clean the Blade Itself
Use a cotton swab dipped in warm water to trace along the blade’s edges and the small gap where it meets the central hub. This is the single spot most people skip, and it’s almost always where the oldest residue lives.
Rinse and Fully Air-Dry
Rinse the bowl under warm running water until no soap film remains, then shake off excess water and set it upside down on a dish rack or towel. Let it air-dry completely — at least a few hours, ideally overnight. Reassembling while damp is one of the fastest ways to trap moisture that turns into mildew odor or even rust on metal blades.
Wipe the Motor Base and Reassemble
While the bowl dries, wipe the motor base and exterior with a barely damp cloth, never letting moisture near the vents or power cord connection. Once the bowl is bone dry, reassemble, do a final check that it locks or seats correctly, and you’re done.
For a manual mortar-and-pestle or hand-crank model, the same logic applies, just without a motor base to protect. If you don’t own an electric grinder at all and are working with alternatives, our piece on how to grind spices without a grinder covers cleanup for those tools too.
Section 05
Removing Stubborn Odors That Won’t Wash Out
Some spices leave a smell that a normal wash simply doesn’t touch. Garlic, fenugreek, asafoetida, and clove are the usual suspects, and their oils bond to plastic and rubber gaskets in a way that mild soap can’t break down. If you’ve already deep-cleaned and the smell is still there, move to one of these methods.
The Rice-and-Rest Method
Fill the dry bowl about a third full with plain rice, seal it, and let it sit for several hours or overnight without grinding. Rice is mildly hygroscopic and will slowly draw out trapped odor compounds from the walls. Discard the rice afterward and do a quick wipe.
The Baking Soda Soak
For removable, water-safe bowls, dissolve a tablespoon of baking soda in warm water and let the bowl soak for 15–20 minutes. Baking soda neutralizes acidic and sulfurous odor compounds rather than just masking them. Rinse thoroughly afterward since baking soda residue can affect taste if left behind.
The Diluted Vinegar Wipe
A cloth dampened with a 1:1 vinegar-and-water mix, wiped across interior surfaces and left for a few minutes before rinsing, works well on grease-heavy odors. Always rinse and dry fully afterward — vinegar smell that lingers is just trading one problem for another.
If garlic specifically is the issue, the rice-and-bread combination tends to outperform liquid methods because it absorbs rather than just dilutes the oil. We cover this technique in detail in how to get smell out of a spice grinder using rice and bread.
Section 06
Cleaning After Oily, Resinous, or Sticky Spices
Not all spices behave the same way once ground. Some, like coriander seed or dried fennel, are dry and crumbly and leave almost nothing behind. Others, like clove, star anise, fenugreek, and especially flax or sesame, release oil the moment the blade touches them, and that oil doesn’t just sit on the surface — it works into seams and gasket grooves.
Why Oily Spices Need a Different Approach
A dry brush alone won’t budge oil-based residue; it just smears it around. For these spices, skip straight to a warm soapy wash rather than relying on the rice method, since rice mainly absorbs surface oil and won’t fully lift a built-up film.
A Practical Routine for Oil-Heavy Spices
- Wipe out as much loose material as possible immediately after grinding, while it’s still loose rather than dried-on.
- Run a rice batch through to absorb the bulk of surface oil.
- Hand-wash with warm water and a small amount of dish soap, focusing on the blade hub and lid seal.
- Dry completely before storing, since trapped oil and moisture together accelerate rancidity inside the bowl.
If you’re frequently switching between dry, brittle spices and oily ones, it’s worth understanding why that switch matters at all — our comparison of grinding whole spices vs. pre-ground explains how oil content changes both flavor and cleanup difficulty.

Oily spices destroying your current grinder bowl?
Stainless steel bowls resist staining and oil absorption far better than plastic over the long run.
See Stainless Options on AmazonSection 07
Cleaning Differences: Blade Grinders vs. Burr Grinders
The cleaning steps above apply to both major grinder types, but the details shift depending on which one you own. Burr grinders, where two ridged plates crush spice between them rather than a spinning blade chopping it, trap residue differently and need a slightly different touch.
| Factor | Blade Grinder | Burr Grinder |
|---|---|---|
| Where residue collects | Around the blade hub and bowl floor | Between the ridged plates and the adjustment mechanism |
| Best cleaning tool | Soft brush + cotton swab | Stiff-bristled small brush to reach between plates |
| Rice method effectiveness | Very effective | Effective, but plates still need manual brushing |
| Disassembly difficulty | Usually simple, one or two parts | Often more parts; check the manual before forcing anything apart |
| Risk of water damage | Moderate if motor is exposed | Higher — burr mechanisms often sit closer to the motor |
If you’re not sure which type you have, or you’re deciding which is better for your kitchen going forward, our full comparison of blade vs. burr grinders for spices breaks down grind consistency, cost, and yes, cleaning effort side by side.
A Note on Dual-Purpose Grinders
If your grinder doubles as a coffee grinder, residue management gets more important, not less, since coffee oils are even more persistent than most spice oils. We cover whether that’s even a good idea in can you grind coffee in a spice grinder.
Section 08
Mistakes That Damage a Spice Grinder During Cleaning
More grinders are ruined by well-intentioned cleaning than by years of normal use. These are the mistakes worth specifically avoiding.
Common Mistakes
- Submerging the motor base directly under a faucet
- Using the dishwasher, where heat warps plastic and water pools in seams
- Scrubbing with steel wool or anything abrasive on the bowl interior
- Reassembling while parts are still even slightly damp
- Using bleach, which can react with leftover spice oils and leave a chemical taste
- Forcing a stuck lid open without checking for a release catch first
Safer Habits
- Always unplug before cleaning, every time, no exceptions
- Hand-wash removable parts only, motor base wiped, never submerged
- Use soft brushes and cotton swabs for detail work
- Air-dry fully, ideally overnight, before reassembly
- Use mild dish soap or baking soda rather than harsh chemicals
- Check the manual if a lid feels stuck rather than forcing it
For the full list of habits to build or break beyond just cleaning, see spice grinder dos and don’ts. And if you’ve already had a lid jam on you, our specific fix is in spice grinder lid stuck.
Section 09
How Often You Should Actually Clean It
There’s no single right answer here, but there is a sensible rhythm based on how you actually use your grinder.
| Usage Pattern | Quick Clean | Deep Clean |
|---|---|---|
| Daily home cook, mixed spices | Every switch between spices | Every 2–3 weeks |
| Occasional use, one or two spices on rotation | Every use | Every 1–2 months |
| Heavy use, oily spices regularly (clove, fenugreek) | Every use, no exceptions | Weekly |
| Dual-purpose (spice + coffee) | Every switch, mandatory | Every 1–2 weeks |
If you notice your grinder isn’t producing the texture it used to, that’s often a cleaning issue before it’s a mechanical one. Check our notes on spice grinder not fine enough if grind consistency has dropped off lately.
Section 10
Cleaning Tools Compared: What’s Actually Worth Buying
You genuinely don’t need to buy anything special, but if you want dedicated tools, here’s how the common options stack up.
| Tool | Best For | Pros | Cons |
|---|---|---|---|
| Soft-bristle brush (toothbrush) | Daily and deep cleans | Cheap, already on hand, gentle on blades | Bristles can fray over time |
| Cotton swabs | Tight seams, blade edges | Reaches places brushes can’t | Slow for larger surface areas |
| Dedicated grinder cleaning tablets | Coffee/spice dual-use grinders | Designed for oil breakdown | Extra cost, not necessary for most spice-only use |
| Microfiber cloth | Exterior and motor base wiping | Lint-free, reusable | Not for interior wet cleaning |
If your existing grinder feels like it’s constantly fighting you no matter how well you clean it, it might genuinely be a build-quality issue rather than a maintenance one. Our roundup of a spice grinder that doesn’t break is worth a look before you blame your routine.

Build a proper cleaning kit in one purchase
A small brush set with detail bristles makes blade hubs and seams far easier to reach than a toothbrush alone.
Shop Cleaning Brush SetsSection 11
Troubleshooting: When Cleaning Doesn’t Fix the Problem
Sometimes a clean grinder still doesn’t behave the way it should. Here’s how to tell whether the issue is cleanliness or something mechanical.
It Still Smells After Deep Cleaning
This usually means odor has worked into a rubber gasket or seal rather than just the hard plastic or metal surfaces. Try the baking soda soak again, focusing specifically on any rubber rings around the lid, and make sure everything is bone dry before sealing it back up. For persistent cases, the full odor breakdown in how to clean a spice grinder odor removal covers gasket-specific fixes.
It Smells Like Burning
This is not a cleaning issue and shouldn’t be treated as one. A burning smell points to motor strain, often from grinding too long in one go or grinding something too hard or too dense for the unit. Stop using it and read spice grinder motor burning smell before running it again.
The Lid Won’t Come Off for Cleaning
Don’t force it. Most stuck lids release with a slight twist-and-lift combination rather than a straight pull, and forcing it can crack the locking tabs. The dedicated fix is in spice grinder lid stuck.
Grind Quality Dropped Even After Cleaning
If everything is clean and the grind is still inconsistent or chunky, the issue may be batch size, spice moisture, or blade wear rather than residue. Compare your results against the notes in spice grinder not fine enough and why does my spice grinder leave chunks.
Section 12
A Long-Term Maintenance Routine Worth Keeping
The goal isn’t a single perfect clean — it’s a routine simple enough that you’ll actually keep doing it. Here’s a realistic version that takes almost no extra time once it’s a habit.
- Every use: empty fully and wipe dry before storing.
- Every spice switch: run the quick rice clean, especially before delicate spices follow pungent ones.
- Every 2–4 weeks: full disassembly and deep clean, including the blade hub and lid seal.
- Monthly check: inspect the cord, motor base vents, and any rubber gaskets for wear or residue buildup.
- As needed: odor treatment with rice, baking soda, or diluted vinegar whenever smell lingers after a normal clean.
A quick test before you store anything: can you safely wash a spice grinder the same way you’d wash any other small kitchen appliance? Mostly yes, with the caveats about the motor base covered throughout this guide. If you’re shopping for a model built around easier cleaning specifically, our reviews of the Cuisinart SG-10 and the Secura spice grinder both call out how each one handles disassembly and cleanup in practice.
FAQ
Frequently Asked Questions
Water alone works for light, dry residue but won’t fully break down oily buildup from spices like clove or fenugreek. For most cleans, plain water plus a soft brush is enough; for oilier residue, add a small amount of mild dish soap.
Generally no. Dishwasher heat can warp plastic components and water can work its way into seams and motor connections that aren’t designed to handle it. Hand-washing removable parts is the safer standard.
Run a batch of plain rice or torn bread through the dry grinder to absorb the trapped oils, then follow with a baking soda soak if any smell remains. Garlic and onion oils bond strongly to plastic, so this sometimes takes two passes.
Yes, diluted white vinegar works well on grease-based residue and odor. Always rinse thoroughly afterward and let the bowl dry fully, since leftover vinegar smell can transfer into the next spice you grind.
Odor often hides in rubber gaskets or lid seals rather than the hard surfaces a normal wash reaches. Try a longer baking soda soak focused on those rubber parts, and make sure everything dries completely before reassembly.
No. The motor base should never be submerged or held under running water. Only wash removable, water-safe parts like the bowl, and wipe the motor housing with a barely damp cloth instead.
Every two to four weeks for typical home use, or weekly if you regularly grind oily spices like clove, fenugreek, or sesame. Daily quick cleans between spices matter just as much as the deep clean itself.
It’s real and effective for surface oil and light odor, since rice is mildly absorbent and the grinding action scrubs the bowl walls and blade. It’s not a substitute for an occasional wash, but it’s an excellent daily habit.
Empty the bowl, run a small batch of plain rice for 10–15 seconds to absorb residue, then wipe the bowl dry with a paper towel. This takes under two minutes and prevents most flavor cross-contamination.
It’s better used as a paste or dissolved in water rather than dry, since dry baking soda alone won’t break down oils effectively and can leave a residue that affects taste if not rinsed out properly.
Sometimes — built-up residue around the blade can interfere with how spices move through the chamber, so cleaning often helps. If the problem persists after a thorough clean, it may point to blade wear or batch size rather than dirt.
A faint, neutral spice smell is normal, since plastic and rubber can hold onto scent at a low level even after washing. A strong, specific, or rancid smell is the signal that more cleaning or odor treatment is needed.
The Bottom Line
Cleaning a spice grinder well isn’t about scrubbing harder, it’s about being consistent with a routine that’s genuinely fast: empty it, run a rice batch through between spices, and give it a full disassembled wash every few weeks. That alone solves the vast majority of flavor-bleed, odor, and buildup problems people deal with for months without realizing there was a fix this simple.
If you’ve worked through this guide and your grinder is still fighting you — persistent smell, jammed parts, or a grind that just won’t come out right — it’s worth checking whether the unit itself has reached the end of its useful life. Our guide to the best spice grinder options is the right next stop if a clean reset of the hardware, not just the bowl, is overdue.

Ready for a grinder that’s actually low-maintenance?
See current top-rated picks with removable, dishwasher-unsafe-but-easy-to-hand-wash bowls.
Browse Top Spice Grinders