SpiceInsider · Deep-Clean Guide
How to Clean a Spice Grinder and Remove Stubborn Odors
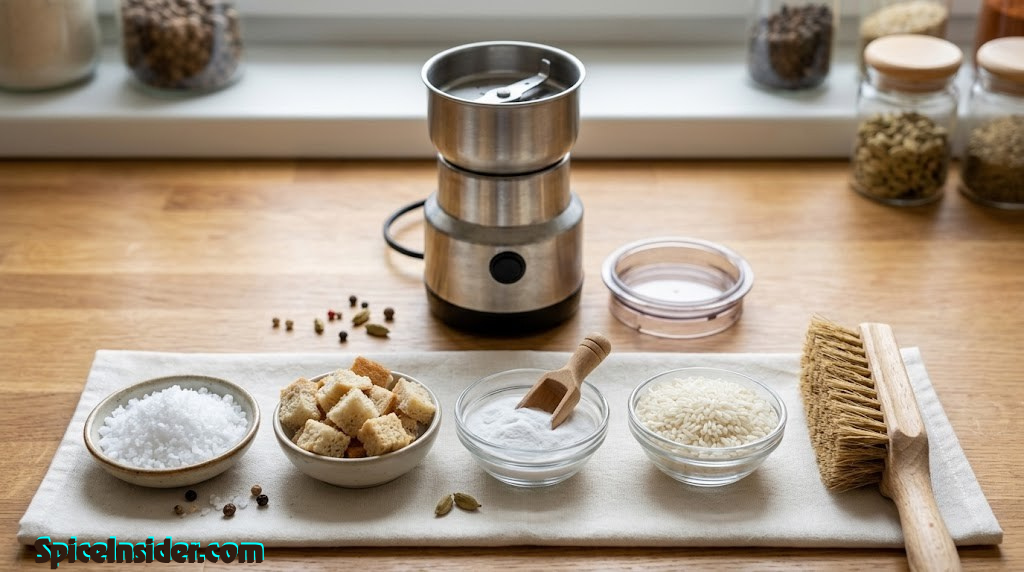
The complete odor-elimination toolkit — most items already in your kitchen
Why Cleaning a Spice Grinder Is Not Optional
Imagine spending ten minutes toasting and grinding a fragrant batch of garam masala — cardamom, cinnamon, clove, and black pepper fusing into something extraordinary. Then, the very next morning, you grind coffee in the same machine. You take your first sip and taste… cumin. Not subtle. Not pleasant. That single experience is why knowing how to clean a spice grinder properly, all the way down to odor removal, is one of the most important skills any serious home cook can have.
A dirty spice grinder does more than cross-contaminate flavors. Residual spice powder can go rancid, introducing stale, off-notes to every grind thereafter. The fine powder that works itself into the motor housing — especially in blade grinders — can accelerate wear and even contribute to overheating over time. If your grinder has ever smelled faintly off during use, you may want to also check our guide on spice grinder motor burning smell, which covers whether that odor is a cleanliness issue or something mechanical.
Beyond flavor fidelity and equipment longevity, there is hygiene. Spice powders are warm, fragrant, and porous — ideal conditions for mold if any moisture gets trapped in the bowl. A grinder that is cleaned regularly, dried completely, and stored properly is simply a healthier kitchen tool.
This guide walks you through every effective cleaning method for a spice grinder, ranked by depth and effort — from the thirty-second daily refresh all the way to a thorough deep clean that will make your machine smell like the day it arrived. Along the way, you will find inline SVG diagrams for every major step, a comparison table, troubleshooting advice for notoriously difficult smells, and a practical maintenance schedule so you never have to scrub as hard next time.
Whether you own one of the best spice grinders currently available or an older workhorse you have had for years, these methods work across virtually every blade and bowl-style electric grinder. For a primer on how different grinder designs affect cleaning difficulty, our breakdown of blade vs burr grinder for spices is worth a read before you dive in.
Before You Start: Understanding Your Grinder’s Anatomy
Cleaning a spice grinder correctly requires knowing what you can and cannot get wet, what you should not scrub, and where oils tend to hide. The anatomy varies somewhat by model, but most electric blade-style spice grinders share a common structure:
- Motor base — houses the motor and electronic components. Never get this wet. Never submerge it. Always unplug before cleaning.
- Grinding bowl / cup — the removable container, usually stainless steel or hard plastic, where spices sit during grinding. This is the component you can and should clean thoroughly.
- Blade assembly — attached to the bottom of the bowl (removable on some models, fixed on others). Fine powder accumulates around the blade attachment point, which is a primary source of cross-contamination odor.
- Lid — seals the bowl during operation. Spice dust coats the inside surface and the gasket or seal ring (if present).
- Underside of the motor shaft — on units with a fixed bowl, spice oils can wick slightly onto the motor shaft. These can only be cleaned by dry methods since introducing moisture here risks motor damage.
Safety first, always: Unplug your spice grinder before cleaning it. The blade spins at thousands of RPM and can cause serious injury. Never attempt to clean a plugged-in grinder, even if it is switched off.
For a broader look at safe operation habits, the spice grinder dos and don’ts guide covers what to avoid beyond just cleaning. And if you are unsure which parts of your specific model can safely contact water, our dedicated article on can you wash a spice grinder breaks down the answer by component type and material.
Now, with a clear picture of the machine in mind, let us move through each cleaning step methodically.

Recommended Tool
Spice Grinder Cleaning Brush Kit
A dedicated stiff-bristle brush makes dry cleaning faster and more thorough — worth every cent for daily maintenance.
View on Amazon ↗Step 01
Dry Brush & Debris Clear
Every cleaning session — whether a quick refresh or a thorough deep clean — should begin the same way: removing all loose powder and debris while the grinder is completely dry. This step is deceptively important. Attempting any wet cleaning on a powder-coated bowl simply turns dry spice dust into a sticky paste that is far harder to remove.
Unplug the grinder, remove the bowl from the motor base (if removable), and invert it over a trash can or sink. Tap the sides gently to dislodge loose powder. Then use a dry, stiff-bristle brush — a dedicated cleaning brush, a clean toothbrush, or a pastry brush — to sweep the interior surfaces, paying special attention to the area immediately around the blade attachment, which tends to trap compacted powder in its crevices.
Wipe the lid and its underside with a dry paper towel. If your model has a rubber gasket around the lid, check it carefully — compacted spice oil accumulates in the groove around the seal. A toothpick or the tip of a skewer is useful for working powder out of tight corners without introducing moisture.
Pro tip: Do this dry debris-clear step immediately after every grinding session, while the powder is still loose and dry. Waiting until spice oils have oxidized and hardened makes this step significantly harder the next time.
For motors that sit exposed at the top of the bowl (upright-blade designs), use a dry cotton swab to clean around the underside of the drive shaft. Never use a wet swab here. This is the single most overlooked area in grinder cleaning, and it is where cross-contamination odors most persistently hide.
Step 02
The Rice Method — Fast Daily Refresh
The rice method has been a kitchen workhorse for decades for one simple reason: it works. Uncooked white rice acts as both a mild abrasive — scrubbing the interior bowl walls as it spins — and an oil absorber, picking up the volatile aromatic compounds that make your grinder smell like last week’s cumin. For mild odors and routine maintenance between deeper cleans, this method alone is often sufficient.
Add roughly two to three tablespoons of uncooked white rice to the dry, debris-cleared bowl. Put the lid on and run the grinder for thirty to forty-five seconds until the rice is ground to a very fine powder. Remove the lid and inspect the powder — if it has turned distinctly yellow, orange, or brown from absorbed spice pigment, discard it and run a second batch. Once the ground rice comes out relatively white, your bowl is clean enough for a daily refresh.
Discard the rice powder (do not cook with it — it will carry spice residue), then wipe the bowl clean with a dry paper towel. The interior walls should feel noticeably smoother and cleaner to the touch.
There is a reason the rice method appears so prominently in our detailed guide on how to get smell out of spice grinder using rice and bread — it is genuinely one of the best quick fixes available, requiring no special supplies and no waiting time. The key variable is rice type: always use plain white rice rather than brown, parboiled, or flavored varieties. Brown rice has oils of its own that can leave behind an unwanted note. Instant rice is also not ideal because it does not provide enough mechanical abrasion.
Limitations: The rice method is excellent for mild to moderate odors. For deeply embedded aromatic oils from high-resin spices like fenugreek, asafoetida, or dried chili, rice alone may not fully resolve the smell. In those cases, proceed to the salt-lemon or baking soda steps below.

Pantry Essential
Coarse Sea Salt (Bulk)
Coarse sea salt is the workhorse of dry spice grinder cleaning — highly abrasive, naturally deodorizing, and effective on stubborn residue.
View on Amazon ↗Step 03
Salt + Lemon Scrub — Mid-Strength Deodorizer
When rice is not quite cutting through a persistent spice smell — the kind that lingers after multiple quick cleans — it is time to bring in coarse salt combined with a small amount of fresh lemon juice. This combination works on two fronts simultaneously: the salt crystals provide aggressive mechanical abrasion that physically scrubs embedded oils off the surface, while the citric acid in lemon juice breaks down the fatty aromatic compounds on a chemical level, making them easier to wipe away.
Add two tablespoons of coarse sea salt or kosher salt to the dry, debris-cleared bowl. Squeeze in approximately half a teaspoon of fresh lemon juice — just enough to dampen the salt slightly without making it wet. Run the grinder for twenty to thirty seconds. The salt will grind down into a fine paste that coats the interior. Let it sit for a minute or two so the citric acid can work on the oils, then use a dry paper towel or a clean cloth to wipe out the entire interior thoroughly.
After wiping, if you detect even a faint lemon smell, run one quick dry pass with a tablespoon of plain white rice to neutralize any residual citrus before your next spice grind. This step-within-a-step may seem like overkill, but citrus oil can be as persistent as spice oil in some materials, especially softer plastic bowls.
The salt-lemon method is particularly effective against turmeric staining and the sticky resinous coating left by star anise and clove. For turmeric specifically, you may need two rounds — the yellow pigment (curcumin) bonds strongly to surfaces and benefits from the mild bleaching effect of citric acid acting over several minutes.
No lemon? Use these alternatives:
- White vinegar — equally acidic, slightly sharper smell but evaporates cleanly. Use the same ratio (half a teaspoon per two tablespoons of salt).
- Cream of tartar — a dry acid you can mix directly with the salt. Use one teaspoon of cream of tartar combined with two tablespoons of coarse salt and grind without adding any liquid.
- Citric acid powder — available in the canning section of most grocery stores. Quarter of a teaspoon dissolved in half a teaspoon of water achieves the same chemical effect as fresh lemon juice, with no additional flavor transfer.
Step 04
The Bread Method — Gentle Absorber for Delicate Grinders
The bread method is the gentlest dry cleaning approach available, making it the right choice for grinders with plastic bowls that can be scratched by coarse salt crystals, or for situations where you want a quick odor absorber without any abrasion whatsoever. Stale or dry bread has an exceptional ability to absorb oils through its porous crumb structure, pulling aromatic compounds off surfaces with purely physical adsorption rather than chemical action.
Tear a single slice of plain white bread — not flavored, not whole grain — into rough cubes of about one inch. Add them to the dry bowl, put the lid on, and run the grinder for thirty seconds until the bread is pulverized into fine crumbs. The bread will absorb whatever oil and residual powder remains on the bowl walls and blade. Discard the breadcrumb powder and wipe the bowl clean.
The bread method is especially well-suited for daily use in households that grind spices very frequently. Its zero-abrasion action means it can be used every single time without any concern about wearing down a plastic bowl’s interior finish — which matters significantly if you want a grinder that stays consistent over years of use. As your ability to get the most out of grinding whole spices versus pre-ground depends partly on the bowl maintaining a clean, undamaged surface, it is worth protecting it with gentle methods wherever possible.
One practical note: only use plain, unseasoned bread. Flavored breads — sourdough with distinctive tang, rye with its caraway notes, anything with seeds or herbs — will transfer their own aromatic compounds into the bowl, which defeats the entire purpose of the exercise.
Step 05
Baking Soda Neutralizer — Targeting Acidic Odor Compounds
Many of the most penetrating spice smells — particularly those from cumin, fenugreek, and certain chili varieties — come from acidic volatile compounds. Baking soda (sodium bicarbonate) is mildly alkaline, which makes it chemically ideal for neutralizing these acidic aromatic molecules rather than simply masking or absorbing them. This makes the baking soda method subtly different in mechanism from the rice or bread methods, and significantly more effective for those particular problem odors.
Add one tablespoon of baking soda to the dry, cleared bowl. Put the lid on and run the grinder for twenty seconds — you do not need long. The baking soda will coat all interior surfaces including the blade and its attachment point. Now unplug the grinder, remove the bowl, and let the baking soda sit inside for five to ten minutes. This dwell time is where the actual neutralization chemistry happens. Then discard the powder and wipe thoroughly with a dry paper towel.
For especially stubborn smells, you can combine the baking soda method with the salt method in sequence: run salt first to physically scrub the walls, wipe clean, then run baking soda and let it dwell. The mechanical removal followed by chemical neutralization is a powerful one-two punch for difficult cases.
Pro tip: Baking soda is exceptionally effective specifically against fenugreek and asafoetida (hing), two of the most notoriously persistent odors in any spice grinder. If you grind either of these regularly, the baking soda method should become part of your standard cleaning rotation.

Natural Deodorizer
Arm & Hammer Pure Baking Soda
The exact grade used for food-safe cleaning. Keeps indefinitely in a sealed container — a kitchen staple that doubles as your best deodorizing agent.
View on Amazon ↗Step 06
Wet Deep Clean — The Monthly Reset
Dry methods handle the vast majority of day-to-day maintenance needs beautifully. But every few weeks — or whenever you notice that dry methods alone are no longer keeping odors fully at bay — it is time for a thorough wet clean of all removable components. This is the reset that keeps your grinder performing like new and prevents the gradual buildup of oxidized spice oil that no dry method can fully address.
The rules here are non-negotiable: the motor base never gets wet. You clean only what you can remove. On most blade-style electric spice grinders, this means the grinding bowl (cup), the blade assembly if it detaches, and the lid. Some models have a fixed blade that cannot be safely separated — in those cases, wet cleaning is limited to the areas you can access by hand while keeping the blade attachment joint dry.
For the wet wash itself: fill a bowl or your sink with warm (not hot) water and add a few drops of unscented dish soap. Immerse the grinding bowl and lid and let them soak for five minutes — this softens any remaining hardened spice oil. Then use a bottle brush or a dedicated cleaning brush to scrub all interior surfaces including the base of the blade, the walls, and the lid’s interior. Rinse thoroughly under running water and inspect — the water should run off clear without any trace of color or fragrance.
After rinsing, shake off excess water and set the components on a clean towel to air dry completely. This is not a step to rush. Moisture that remains trapped in the bowl — especially around the blade attachment point — can cause spices to clump or even enable mold growth in warm kitchens. Give the components at least thirty minutes of open-air drying, and ideally a few hours if your kitchen has any humidity. See our full walkthrough on how to clean a spice grinder for model-specific guidance on certain popular brands.
Hot water warning: Avoid very hot or boiling water on plastic bowls and lids. The heat can cause warping that affects the lid’s seal and eventually the motor fit. Warm water — comfortable to the touch — is the right temperature throughout.
Step 07
Coffee-Bean Odor Reset — Aromatic Override
If you use your spice grinder for both spices and coffee, or if you are open to an unconventional approach for stubborn residual odors, grinding a small amount of whole coffee beans is one of the most effective odor-override methods available. Coffee’s volatile aromatic compounds are extraordinarily powerful — so much so that they can effectively mask and even chemically displace many spice odors that resist other methods. This is the same reason freshly roasted coffee beans are used as palate cleansers in perfume shops.
Grind a tablespoon of whole coffee beans for twenty to thirty seconds. The resulting coffee powder will draw out and embed residual spice oils. Discard the powder, wipe the bowl clean, then run a final quick pass with plain white rice to neutralize any coffee residue before your next spice grind.
There is an important caveat here: this method works beautifully if you plan to grind coffee in the machine next. If your next use is another spice grind, you will want to follow up with the rice method to clear the coffee residue first. The question of how to manage this two-way usage is worth exploring in depth — our guide on can you grind coffee in a spice grinder covers the practical logistics and which spices and coffee roast profiles coexist most gracefully.
Step 08
Dry Thoroughly & Reassemble
The final step of any cleaning session is the one most frequently underestimated: drying. Regardless of whether you did a full wet deep clean or a simple wipe after a dry method, ensuring every component is completely moisture-free before reassembly and storage is critical. Trapped moisture does several things, none of them desirable: it causes freshly ground spice powder to clump on contact with the bowl walls, it can accelerate rust on the blade if your model has carbon steel rather than full stainless components, and in warm kitchens, it creates a hospitable environment for mold.
The best drying approach after a wet clean is to place the bowl and lid inverted on a clean dry towel and let them air dry at room temperature. Avoid drying in an oven or using a hair dryer — both can warp plastic components and can stress the stainless steel bowl’s protective coating over time. The only heat-based drying that is safe for most models is placing components in bright sunlight (outdoors or on a windowsill), which also has a mild deodorizing effect through UV exposure.
Once everything is completely dry — run your fingertip around the inside of the bowl including deep near the blade attachment, where water tends to pool — reassemble the grinder and store it with the lid slightly ajar rather than sealed tight. Storing with a sealed lid traps any remaining atmospheric moisture inside and can contribute to the faint musty smell some grinders develop over time.
All Cleaning Methods Compared at a Glance
Different situations call for different approaches. Some days you have two minutes and want a quick refresh; other times you notice a persistent odor that dry methods alone will not fix. This comparison table maps each method against the criteria that matter most in a real kitchen workflow.
| Method | Time | Odor Strength | Best For | Requires Water | Type |
|---|---|---|---|---|---|
| Dry brush | 1–2 min | Mild / routine | Daily after-use cleanup | No | FAST |
| White rice | 2–3 min | Mild to moderate | Most everyday cleaning | No | FAST EASY |
| Bread cubes | 2–3 min | Mild | Plastic bowl grinders | No | FAST EASY |
| Coarse salt | 3–5 min | Moderate to strong | Stubborn residue | No | EASY |
| Salt + Lemon | 5–8 min | Moderate to strong | Turmeric, pigment staining | Drops only | DEEP |
| Baking soda | 8–12 min | Strong / acidic odors | Cumin, fenugreek, chili | No | DEEP |
| Coffee beans | 3–5 min | Persistent / all types | Override method; pre-coffee use | No | FAST |
| Wet deep clean | 30–60 min (incl. dry) | All levels | Monthly reset; heavy buildup | Yes | DEEP |
For the vast majority of home cooks, a two-tier approach works best: dry brush plus one dry method (rice or bread) after every few uses, with a wet deep clean once a month. If you work with particularly pungent spices regularly — fenugreek, asafoetida, strong chilis — add the baking soda method in between dry and wet cleaning cycles.

Upgrade Pick
Top-Rated Electric Spice Grinders
If your grinder retains odors stubbornly despite thorough cleaning, the bowl material or blade design may be the culprit. Browse top-rated options with stainless steel bowls for easier cleaning.
View on Amazon ↗Conquering Stubborn Odors — The Problem Spices
Not all spice odors are created equal. The methods covered above handle the majority of cleaning situations admirably, but a handful of spices are genuinely difficult — their aromatic compounds are either extremely volatile and penetrating, or they contain pigments and resins that form semi-permanent bonds with bowl surfaces. Understanding which spices fall into this category, and why, lets you approach their cleanup with the right expectations and escalated strategy.
Turmeric
Turmeric contains curcumin, a vivid yellow pigment that is both lipophilic (fat-loving, so it bonds to the oils already on your bowl surface) and photostable (resistant to UV breakdown). A single grind of turmeric can stain a plastic bowl permanently — or at minimum, very stubbornly. For turmeric cleanup, do not start with gentle methods. Go directly to salt-plus-lemon and repeat twice, letting the citric acid dwell for three to five minutes each time. For particularly deep yellow staining on a plastic bowl, a diluted bleach solution (one part bleach, ten parts water) applied with a cotton swab to the stained areas, then rinsed thoroughly, is the only reliable de-staining option.
Fenugreek and Asafoetida (Hing)
Both of these spices are legendary for their staying power in a grinder. Fenugreek’s bitter aroma comes from solotone and similar compounds that are remarkably stable; asafoetida is sulfur-forward in a way that seems to permeate porous surfaces. For both, the baking soda method with a full ten-minute dwell is the first-choice approach. For truly entrenched hing odors, some cooks run two consecutive baking soda cycles before moving to a wet deep clean — and even then, a faint ghost of the smell may persist for a week or two of normal use before fully clearing.
Clove and Star Anise
These are high in eugenol and trans-anethole respectively — both are powerful enough to dominate any subsequent grind for weeks if the grinder is not cleaned properly. The resinous quality of these aromatic oils makes them physically sticky in a way that simpler spice powders are not. Coarse salt abrasion followed by the baking soda treatment is the recommended sequence. A paste made from equal parts baking soda and lemon juice applied directly to the bowl interior with a brush — left to sit for fifteen minutes before scrubbing and rinsing — is particularly effective against these resinous residues.
Dried Chilies and Chili Blends
The heat compounds (capsaicins) in dried chili are both volatile and persistent. More practically, chili powders often leave behind an oily orange or red stain similar in character to turmeric, though usually less stubborn. The salt-lemon method handles most chili cleaning well. One important safety note: during the dry brush step after grinding chilies, be careful not to touch your eyes until you have washed your hands, and avoid breathing the dry powder directly during cleanup.
Odor quarantine strategy: If you grind any of these highly aromatic spices, consider designating that grinder bowl exclusively for high-odor spices and using a second bowl or a separate grinder for milder spices and coffee. Some models, particularly those reviewed in our Cuisinart SG-10 review and Secura spice grinder review, sell spare bowls separately for exactly this purpose.
If stubborn odors persist through all cleaning methods, the problem may be with the grinder itself rather than your cleaning technique. Cracked or deeply scratched bowl interiors create porous surfaces where oils accumulate beyond the reach of any cleaning method. This is a situation where upgrading to a model with a different bowl material, or replacing the bowl, is the practical solution. See our guide on spice grinders that don’t break for durable options with easy-clean bowl designs.
Pros and Cons of Deep vs Quick Cleaning Methods
✓ Deep Cleaning
- Eliminates ingrained odors completely
- Removes hardened oil residue
- Resets bowl to near-new condition
- Extends grinder lifespan
- Best flavor fidelity on next grind
△ Deep Cleaning
- Requires 30–60 min drying time
- More effort per session
- Cannot be done on fixed-blade models as thoroughly
- Monthly cadence only
✓ Quick Dry Methods
- Under 5 minutes start to finish
- No drying time needed
- Safe for every grinder type
- Works daily or after every use
△ Quick Dry Methods
- Cannot remove deeply embedded oils
- Ineffective against heavy pigment stains
- May require multiple cycles for strong spices
- Not a substitute for periodic deep cleans
Building a Maintenance Schedule That Actually Sticks
The most effective cleaning routine is one you actually follow. The reality of a busy kitchen is that elaborate procedures get skipped; simple ones become habits. Here is a practical, tiered maintenance schedule designed around how people actually cook rather than how they theoretically should.
After Every Use
Invert the bowl over a trash can and tap out loose powder. Run a dry paper towel around the inside of the bowl. If switching spice types in the same session, do a quick thirty-second rice grind between spices to clear carryover flavor. That is it. Two minutes maximum.
Weekly (or After Heavy Use Sessions)
Do a full dry clean cycle with either rice or bread. Check the lid gasket for accumulated powder and wipe it out with a dry cotton swab. Wipe the motor base exterior with a slightly damp (not wet) cloth to remove any powder that has settled on the outside. Check the bowl interior for any developing stains or residue buildup — catching staining early makes it dramatically easier to remove.
Monthly
Full wet deep clean of all removable components. Let everything dry completely before reassembly. This is also a good time to check for any lid-fit issues (warping, cracked seals) or blade dulling. A dull blade is actually a cleaning-related issue more often than people realize — buildup around the blade attachment can create micro-vibration that accelerates wear. Our piece on spice grinder not fine enough covers the relationship between maintenance and grind quality.
When Switching Between Very Different Spice Categories
Whenever moving from a high-odor spice (fenugreek, asafoetida, clove) to a delicate one (cardamom, dried citrus zest, vanilla), or from any spice to coffee or vice versa, always perform at minimum the rice method plus one additional dry cycle before making the switch. The additional cycle provides a genuine buffer against flavor transfer. For the most sensitive applications — grinding delicate spices for fine baking, for instance — a quick baking soda pass can also serve as an extra insurance step.
For deeper context on building good grinding habits from the ground up, the how to use a spice grinder guide and the article on how to toast spices before grinding cover the full workflow from preparation through to cleanup. And if you want to go beyond electric grinding entirely, how to grind spices without a grinder is worth bookmarking for days your electric model needs more drying time than you have.
Troubleshooting: What Might Be Going Wrong If Cleaning Is Not Working
| Symptom | Likely Cause | Solution |
|---|---|---|
| Persistent smell after multiple cleans | Scratched bowl surface trapping oil | Replace bowl or upgrade grinder |
| Yellow staining won’t budge | Turmeric curcumin bonded to plastic | Diluted bleach on swab; repeat salt-lemon |
| Lid doesn’t seal properly after cleaning | Warped from hot water or oven drying | Replace lid; only use warm water |
| Burning smell during grinding | Motor issue, not cleanliness | See motor burning smell guide |
| Lid stuck after reassembly | Residual moisture swelling seal | See stuck lid guide |
| Chunks left behind after grinding | Residue buildup interfering with blade | Full deep clean; see chunks guide |

For Your Next Grind
Premium Whole Spices for Fresh Grinding
A perfectly clean grinder paired with high-quality whole spices is the combination that makes the real difference. Explore top-rated whole spice assortments for home grinding.
View on Amazon ↗Advanced Tips for Specific Grinder Types
The methods described above apply universally to blade-style electric spice grinders, which represent the vast majority of what home cooks use. But there are some nuances worth knowing if you own a less common style of grinder or a model with particular design characteristics.
Blade vs. Burr: Does Cleaning Change?
Burr grinders — which use two abrasive plates to crack spices between them rather than spinning blades — have a more complex internal geometry that makes cleaning meaningfully harder. Spice oils and fine powder can accumulate between the burrs themselves, requiring disassembly for thorough cleaning that is beyond the scope of the dry methods described here. Most spice-focused burr grinders come with a specialized cleaning brush for exactly this reason. The fundamental difference in design is explored in our blade vs burr grinder comparison, which includes cleaning difficulty as one of the key evaluation criteria.
Models With Removable Blades
Some grinders, including certain KitchenAid and Cuisinart models, feature a removable blade assembly that separates completely from the bowl. This is a significant cleaning advantage: you can hand-wash the blade separately, accessing all surfaces, and then dry it individually before reassembly. If your model has this feature, use it every time you do a wet deep clean. The difference in how clean the blade area gets compared to a fixed-blade design is substantial.
Suction-Cup Base Grinders
Some countertop models use rubber suction pads on the motor base. Spice powder can infiltrate the underside of these pads over time, creating an odor source that dry cleaning of the bowl alone will not address. Periodically remove the suction pads if they detach, wipe them clean with a barely damp cloth, and let them dry completely before reattaching. This is a cleaning step many owners skip for years without realizing it is contributing to overall machine odor.
Shared Coffee and Spice Use
If you run one grinder for both coffee and spices — which many home cooks do — establishing a clear cleaning protocol between uses is not optional; it is the difference between great coffee and great spices versus mediocre versions of both. The coffee-to-spice transition requires the rice method minimum. The spice-to-coffee transition ideally involves rice plus baking soda. Our complete guide on grinding coffee in a spice grinder has a dedicated section on exactly this workflow.
Cleaning Vintage or Manual Grinders
Cast iron and stone hand-operated spice grinders have their own cleaning rules entirely. They should almost never be washed with soap (which penetrates porous stone and iron and leaches back into food for weeks), and wet methods should be minimized. For these traditional tools, the dry brush followed by dry rice is essentially the complete cleaning protocol. Seasoning a stone or cast iron grinder — grinding plain rice or neutral grain multiple times after cleaning to re-neutralize the surface — is a practice borrowed from caring for cast iron cookware.
Frequently Asked Questions
How often should I clean my spice grinder?
Do a quick dry clean (rice or bread method) after every use or every couple of uses, especially when switching between strongly aromatic spices. A deep wet clean should be done every one to two months depending on usage frequency. If you use your grinder daily, monthly deep cleans are strongly recommended to prevent the gradual accumulation of oxidized oil that no dry method can fully address.
Can I wash my spice grinder with water?
You can wash only the removable bowl, blade assembly (if removable), and lid with water. Never submerge the motor base or allow water near the motor housing. For detailed guidance on what can and cannot be washed, check our full breakdown on can you wash a spice grinder.
Why does my spice grinder still smell after cleaning?
Aromatic oils from spices like cumin, fenugreek, and clove penetrate tiny surface scratches in the grinding bowl, especially in plastic-lined models. A single cleaning cycle may not be enough. Repeat the salt-plus-lemon method or the baking soda method two to three times for persistent odors. If the smell persists through multiple cycles, the bowl may be scratched beyond the reach of surface cleaning methods.
What is the fastest way to clean a spice grinder?
The fastest effective method is the rice method: grind a small handful of uncooked white rice for thirty to forty-five seconds, then wipe the bowl clean with a dry paper towel. It absorbs residual oils and neutralizes mild odors in under two minutes. For the very quickest option with no grinding required, a stiff dry brush sweep takes under sixty seconds and handles loose powder removal completely.
Is it safe to use baking soda in a spice grinder?
Yes, baking soda is completely safe to use in a spice grinder. Grind a tablespoon of baking soda for twenty seconds, then let it dwell for five to ten minutes before discarding and wiping clean. Its mild alkalinity neutralizes acidic aromatic compounds responsible for lingering smells without scratching or damaging bowl surfaces. It is one of the most effective and safest options available for strong odors.
Can I use vinegar to clean a spice grinder?
You can use diluted white vinegar on the removable bowl and lid — wipe with a cloth dampened in a fifty-fifty vinegar-water solution. Never pour liquid vinegar directly into the grinder or attempt to grind it, as the liquid can wick into the motor housing through the blade attachment joint and cause damage over time. The safest wet application of vinegar is by cloth or cotton swab, not by submersion or pouring.
Why does my spice grinder smell like burning?
A burning smell during or after grinding usually signals an overloaded or overheating motor rather than a cleanliness issue — though resin-rich spice buildup around the blade can sometimes contribute to motor strain over time. Learn more about diagnosing this in our guide to spice grinder motor burning smell.
Does grinding coffee remove spice smell from a grinder?
Yes, grinding a small amount of coffee beans is a popular and effective method for neutralizing spice odors because coffee’s aromatic compounds are powerful enough to overpower residual spice oils. However, if you plan to use the grinder for coffee afterward, you may taste faint spice notes in your brew. For the cleanest result, follow the coffee grind with a rice grind to clear any remaining residue before brewing.
Can I put my spice grinder bowl in the dishwasher?
Some removable stainless steel bowls are dishwasher-safe — check your model’s manual. Plastic bowls and lids can warp in high heat dishwasher cycles, which affects the lid seal and motor fit. When in doubt, hand-wash only with warm soapy water and air dry completely before reattaching to the motor base. The dishwasher is generally not worth the risk for the modest extra convenience it provides.
What spices are hardest to clean out of a grinder?
Fenugreek, cumin, star anise, clove, asafoetida (hing), and turmeric are the most stubborn. Turmeric in particular leaves a yellow pigment that requires repeated cleaning cycles. For these spices, a double-clean approach works best: first a dry method, then a damp wipe with diluted lemon juice on the removable components, followed by thorough drying.
How do I clean a spice grinder without rice?
If you do not have rice, use dry bread cubes, coarse salt, stale crackers, or dry oatmeal. All of these act as dry abrasive absorbers that collect residual oils and powder. Alternatively, use a stiff brush to sweep the dry bowl thoroughly, followed by a damp wipe with a cloth (not soaking wet) on the removable parts, then dry completely before reassembly.
How long should I let the spice grinder dry before using it again?
After any wet cleaning, allow all removable components to air dry completely for at least thirty minutes — ideally a few hours. Moisture left inside the bowl can cause spices to clump on your next use and can also accelerate mold growth in warm kitchens. Running your finger around the inside of the bowl near the blade attachment point is the best way to confirm it is truly dry, since water tends to pool there.
Final Thoughts: A Clean Grinder Is a Better Grinder
Cleaning your spice grinder is not a chore to put off until your coffee tastes of cardamom. It is a fundamental act of culinary respect — for the ingredients you are working with, for the flavors you are trying to achieve, and for the equipment that makes it all possible. The methods in this guide, from the two-minute daily rice refresh to the monthly wet deep clean, form a complete system that can be adapted to any kitchen, any grinder, and any cooking intensity.
The key insight is that the best cleaning happens before buildup sets in — not after. A grinder that is cleaned lightly and consistently is infinitely easier to maintain than one that is cleaned intensively every few months after odors become obvious. Make the dry brush and the rice method as automatic as washing your knife after chopping, and you will rarely need to deal with the stubborn cases that require real effort.
For the best results, pair your clean grinder with quality whole spices and the right technique. If you are ready to go deeper on the grinding process itself, our best spice grinder guide covers the top models with ease of cleaning as a key evaluation factor. And if your current grinder is showing wear that cleaning alone cannot fix, it may be time for an upgrade.
Browse Top Spice Grinders →
Complete Kit
Spice Grinder Care Essentials Bundle
Everything you need for a thorough cleaning routine: stiff-bristle cleaning brushes, coarse sea salt, and cotton cleaning swabs for detail work.
View on Amazon ↗